---
title: Create AI Product Videos
description: Learn how WizStudio Video Generator turns product photos into AI-generated lifestyle, close-up, ad, UGC, and 360° spin videos — no shoot required.
---
[Skip to content](https://knowledge.wizcommerce.com/create-ai-product-videos#main-content)
[](https://wizcommerce.com/)
Open main navigation
Close main navigation
- [Contact us](https://mail.google.com/mail/?view=cm&fs=1&to=help@wizcommerce.com)
[Contact us](https://mail.google.com/mail/?view=cm&fs=1&to=help@wizcommerce.com)
Hi, how can we help?
- There are no suggestions because the search field is empty.
1. [WizCommerce Help Centre](https://knowledge.wizcommerce.com/)
2. [WizStudio](https://knowledge.wizcommerce.com/wizstudio)
September 30, 2026
# Create AI Product Videos
**WizStudio** offers a **full production workflow** built on its AI video generation capabilities. You get dedicated flows for lifestyle videos, product close-ups, advertisements, UGC-style videos, and 360° spins plus avatars, a script assistant, and a storyboard preview before you spend any credits.
This article walks through the interface and how to go from a product photo to a finished, edited video.
**Platform:** WizStudio | **Who is this for:** Marketing, Product, and E-commerce Teams
---
#### **Table of Contents**
| **Sections** | **Topics** |
| --- | --- |
| **A** | [What is AI Video Generator?](https://knowledge.wizcommerce.com/create-ai-product-videos#sec-a) |
| **B** | [Choose a Video Type (Use Case)](https://knowledge.wizcommerce.com/create-ai-product-videos#sec-b) |
| **C** | [Upload Your Product and Add References](https://knowledge.wizcommerce.com/create-ai-product-videos#sec-c) |
| **D** | [Write Your Script](https://knowledge.wizcommerce.com/create-ai-product-videos#sec-d) |
| **E** | [Preview with the Storyboard](https://knowledge.wizcommerce.com/create-ai-product-videos#sec-e) |
| **F** | [Choose a Generation Type and Generate Video](https://knowledge.wizcommerce.com/create-ai-product-videos#sec-f) |
| **G** | [Pricing and Credits](https://knowledge.wizcommerce.com/create-ai-product-videos#sec-g) |
| **H** | [Switch Between Different Video Types](https://knowledge.wizcommerce.com/create-ai-product-videos#sec-h) |
| **I** | [FAQs](https://knowledge.wizcommerce.com/create-ai-product-videos#faqs) |
---
### A. What is AI Video Generator?
**AI video generator** is **WizStudio's** AI video generation suite, built to cover a wider range of video needs than a single generic clip. From one product photo, you can produce fully edited videos across five use cases: **Lifestyle**, **Product Close-Up**, **Advertisement**, **UGC**, and **360° Spin**.
Every video you generate through **AI video generator** goes through the same core workflow: upload your product, add supporting references (images, avatars, audio), build a script either manually or with the Script Assistant, preview it as a storyboard, and then generate the final video.
---
### B. Choose a Video Type (Use Case)
Open **WizStudio** and select the video type that best fits what you want to create:
| **Use Case** | **Description** |
| --- | --- |
| **Lifestyle** | Shows your product staged in a realistic scene or setting |
| **Product Close-Up** | Highlights product texture, detail, and craftsmanship |
| **Advertisement** | Produces a polished, marketing-ready promotional video |
| **UGC** | Mimics the look and feel of user-generated content |
| **360° Spin** | Rotates the product through a full 360-degree view |
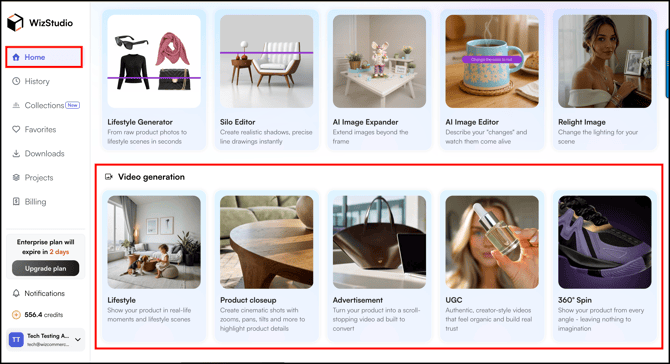
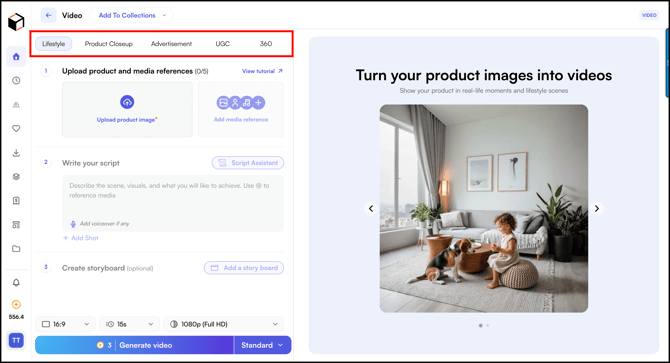
Once you are in the video generator, you can switch between different video types — **Lifestyle, Product Closeup, Advertisement, UGC, and 360°** — using the tabs at the top.
---
### C. Upload Your Product and Add References
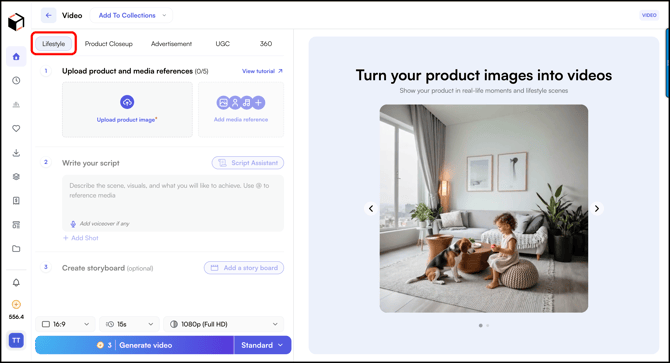
Once you select a use case (for example, **Lifestyle**), you will be prompted to upload a product image. Beyond the product itself, you can add up to four additional **media references** per video to help shape the final result.
**Reference types you can add:**
- **Uploads:** Upload an image directly from your device. It's saved to your account permanently for reuse.
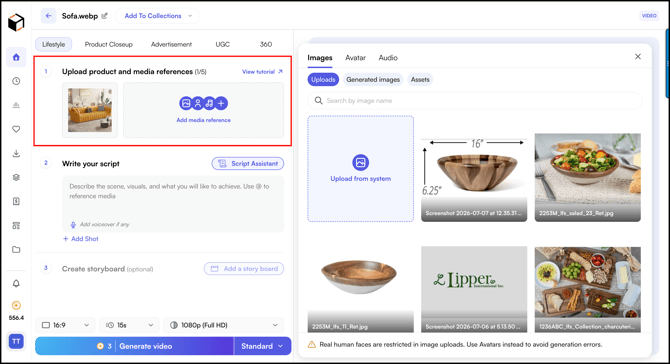
- **Generated Images:** Reuse images you have already created in **WizStudio**, including from tools like the Silo Editor.
- **Assets:** Reuse assets you have previously uploaded to the platform.
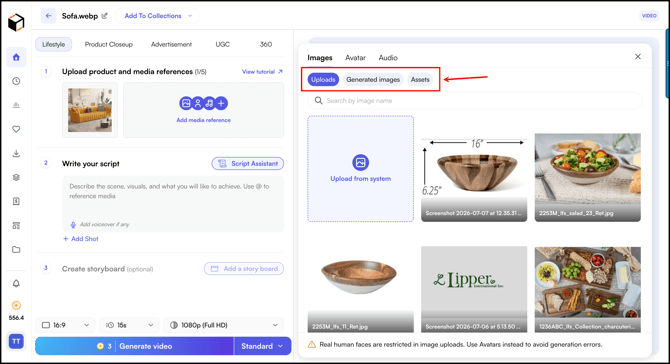
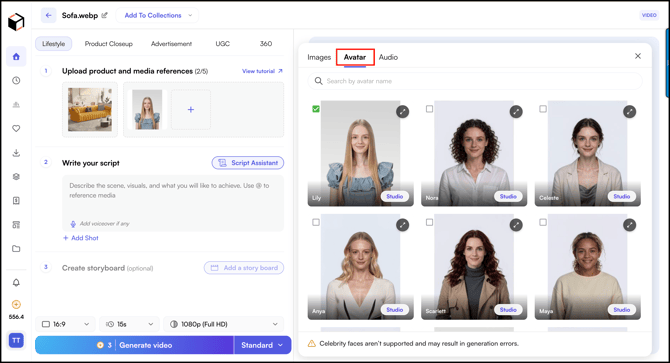
- **Avatars:** A library of human faces you can use in your video. Real, identifiable human photos can't be uploaded as standard image references. Use Avatars for any video that needs a human presence.
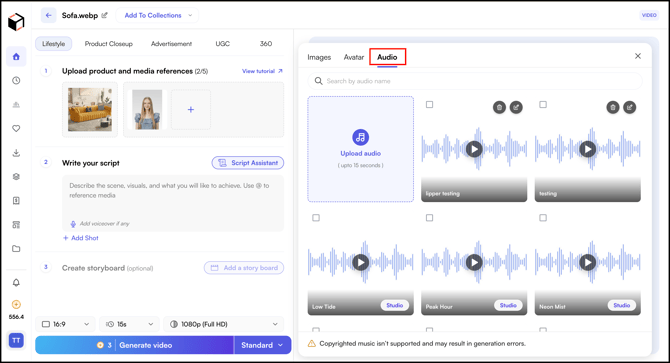
- **Audio:** Upload your own audio to use as background music or choose from the built-in audio library.
##### **» Avatars**
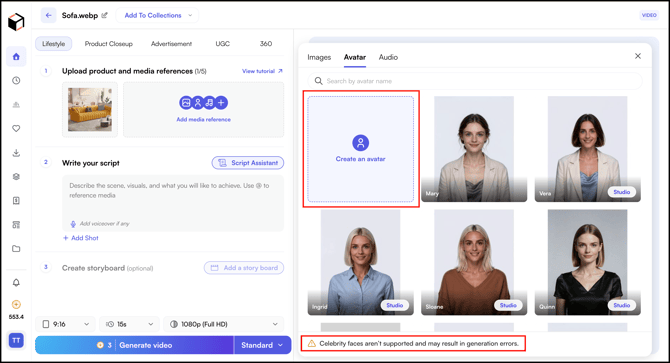
**Avatars** are the way to add human faces to your videos without uploading real people's photos. You can:
- Create a custom avatar by uploading up to 4 profile images
- Browse and use a preset avatar library
Uploading celebrity faces as avatars isn't supported and may result in a failed generation due to copyright restrictions. The same restriction applies to copyrighted or licensed music uploaded as audio references.
---
### D. Write Your Script
After uploading your product and references, move to the script step. Your script now loads directly into the editor, you no longer need to click a separate script icon to open it. You have two options:
1. **Write your own script manually**, including voiceover text and shot-by-shot direction.
2. **Use the Script Assistant** to build the script step by step.
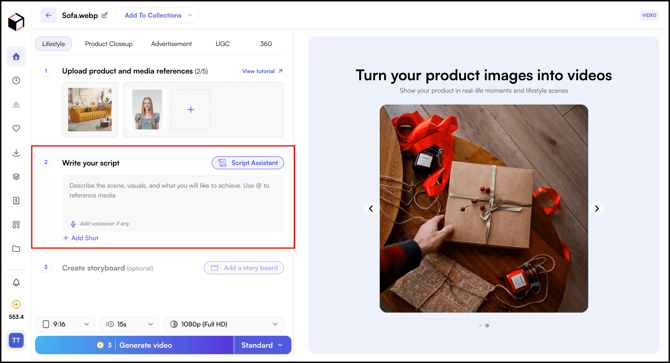
##### **» Using the Script Assistant**
The **Script Assistant** helps you go from a blank page to a finished script:
1. Open the Script Assistant.
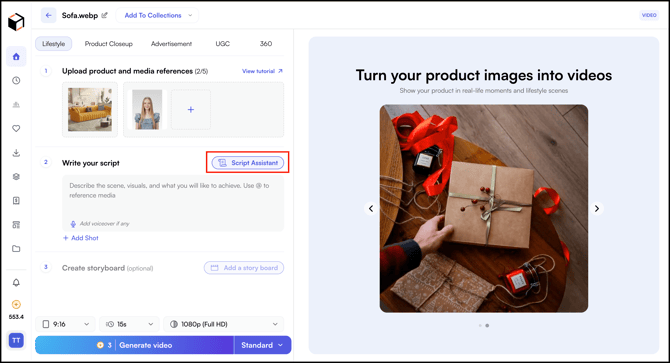
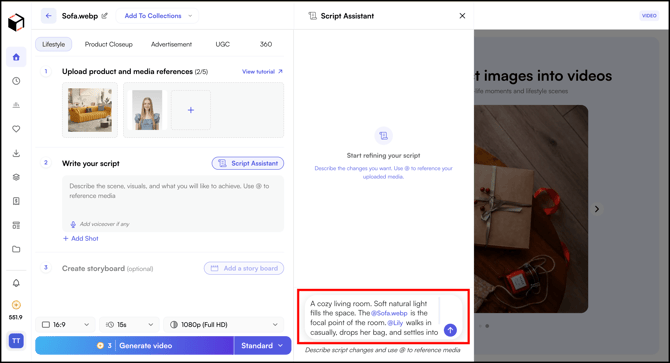
2. Describe what you want the script to cover (for example, "A cozy living room. Soft natural light fills the space. The sofa is the focal point of the room"). Use @ to reference media.
3. Once the script is ready, you will be notified for review. Click **Script is ready for review**.
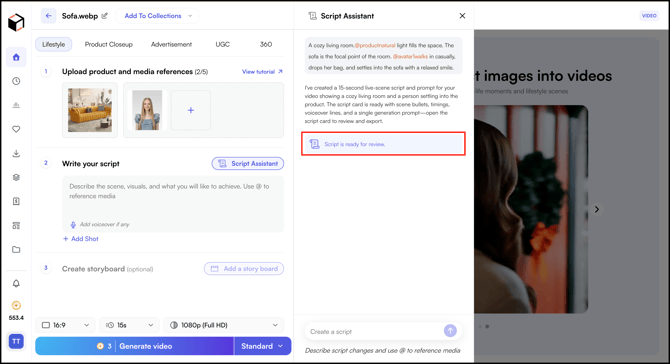
4. Review the generated script. It will include voiceover text and shot descriptions for each scene. You can edit the script as well as voiceover if you want.
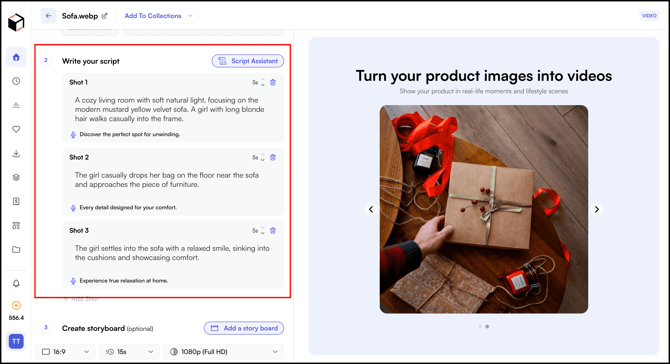
5. To change the voiceover, type what you want in the voiceover field.

6. To use a specific audio for the voiceover, click **Add Media Reference**.

7. Go to the **Audio** section and select the audio you want to use. Choose an audio from our library or upload audio of your choice.

8. Type **@** to reference the audio and select it from the available media.

9. Once selected, WizStudio will use that audio for the voiceover.

**Note:** You can go back to the Script Assistant at any point — including after reviewing your storyboard or a generated video — to enhance the script, add close-ups, increase on-screen text, or bring in an additional product.
---
### E. Preview with the Storyboard
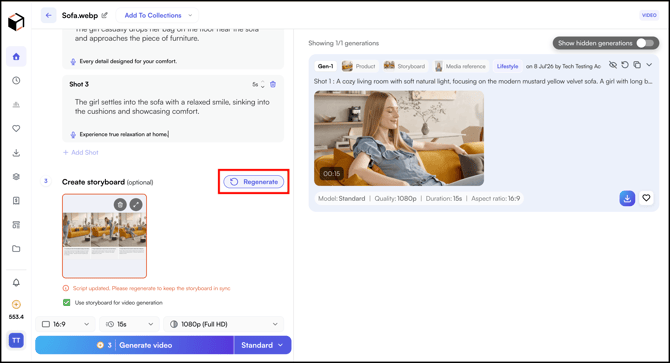
Before spending credits on a full video, generate a **Storyboard**. The storyboard renders one representative image per shot in your script, so you can see how the video will actually look, scene by scene, without generating the final video.
1. Finalize your script.
2. Click the **ⓘ icon** on the storyboard placeholder to see example storyboards before you generate one.

3. Click **Add a storyboard**.
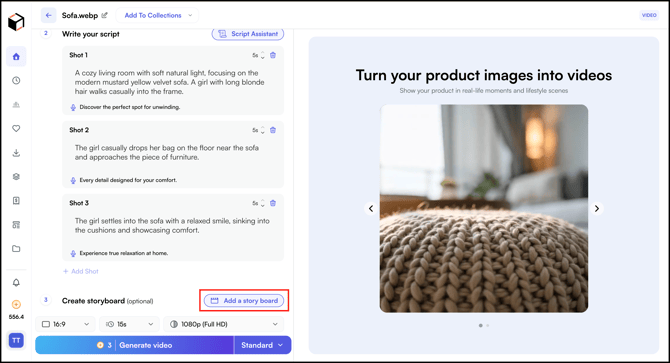
4. Expand the **storyboard** to review each shot.
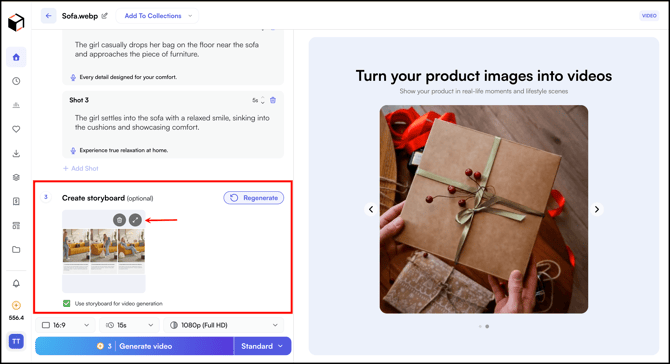
5. Review each shot's image alongside its voiceover and shot description.
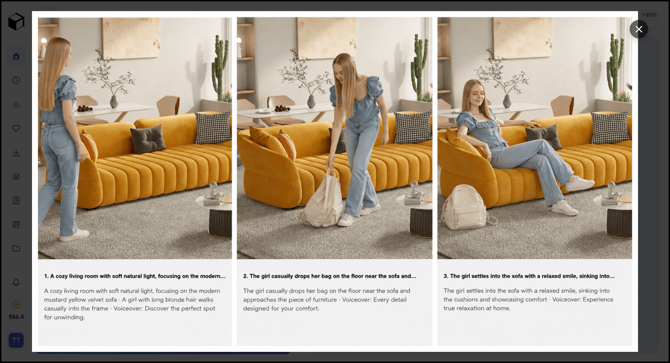
6. Make edits to the script based on what you see (for example, extending a product close-up or adding on-screen text).
7. If you edit the script after generating a storyboard, click **Regenerate** to sync the storyboard with your latest changes.
---
### F. Choose a Generation Type and Generate Video
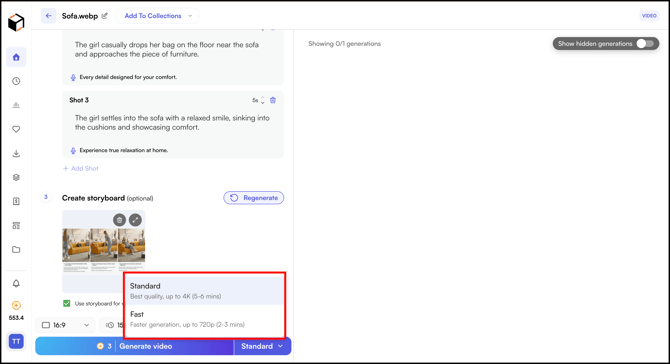
1. Once your script and storyboard are finalized, choose a generation type and set your video parameters:
| **Type** | **Best for** | **Resolution & Time** |
| --- | --- | --- |
| **Standard** | High-quality output for finished, publish-ready videos | Up to 4k (5-6 mins) |
| **Fast** | Faster turnaround for prototyping | Up to 720p (2-3 mins) |
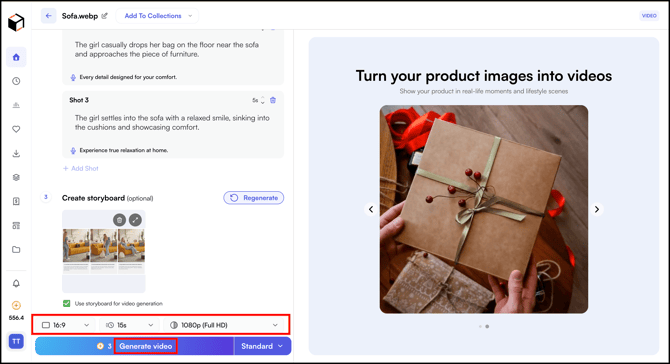
2. Set your desired video resolution and duration, then click **Generate Video**.
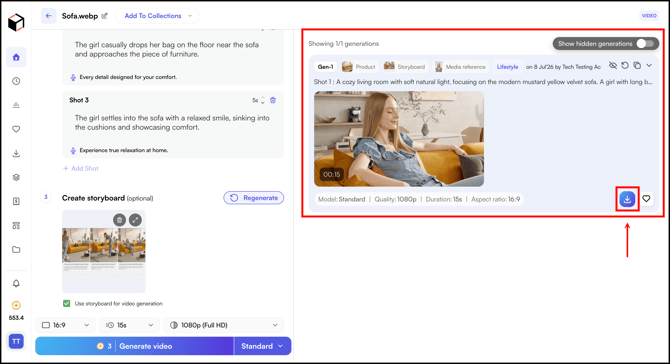
3. Once generated, download the video.
**Note:** If you encounter an audio or copyright error while generating a video, you will see an option to **generate or download the video without audio**. You can then add your own background music after downloading the video.
##### **» Edit Script and Voiceover After Generating a Video**
1. You can edit the script and voiceover even after generating a video.
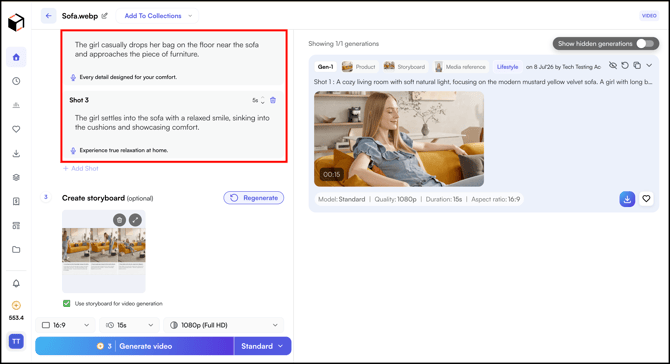
2. If you make any changes after generating a video, a warning will appear asking you to sync the storyboard.
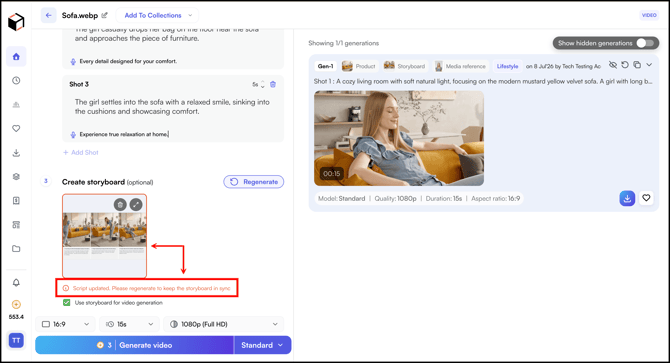
3. Click **Regenerate** to sync the storyboard with your latest changes.

4. Click **Generate Video** to generate the video again with changes.
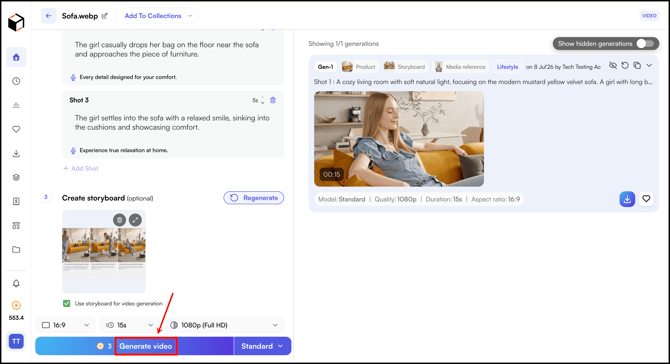
5. And then download the video.

6. This may take a few minutes. Once done, you will receive a notification. Go to **Notifications**, click on the completed notification, and you will be redirected to the video.

7. **Generated Video →**
---
### G. Pricing and Credits
- New users get **3 free trial generations** with AI Video Generator.
- After your free trials, video generation is charged in credits.

---
### H. Switch Between Different Video Types
1. You can switch between different video types — Lifestyle, Product Closeup, Advertisement, UGC, and 360° — using the tabs at the top. For example, if you're on the Lifestyle tab and switch to Product Closeup, Advertisement, UGC, or 360°, you'll see two options.
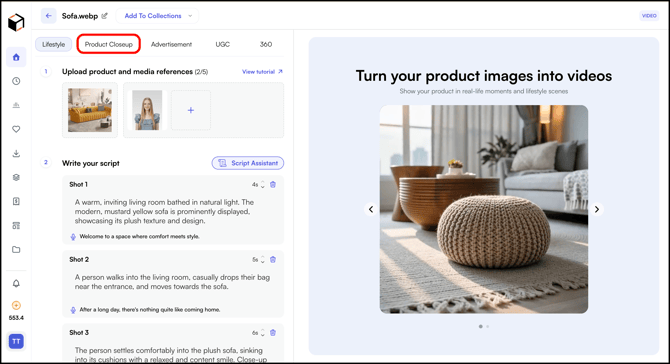
2. When you switch, a prompt will appear with two options. Select the one that works for you and click **Confirm Switch**.
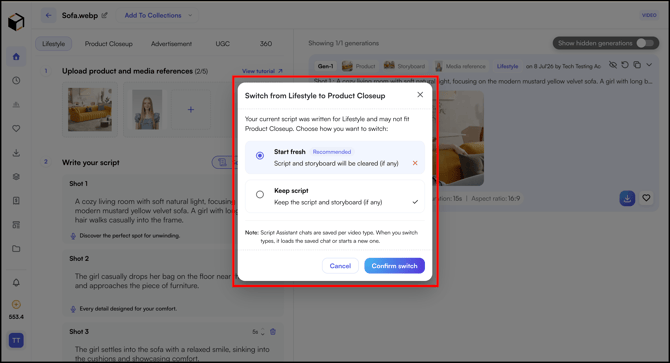
3. Follow the same steps to create ***Product Closeup, Advertisement, UGC,*** and ***360° videos***.

---
#### FAQs
**1. Which image should I upload for a lifestyle video versus a 360° spin?**
**A.** Use a lifestyle image (product staged in a scene) for Lifestyle and Product Close-Up videos. Use a silo image (clean background, no scene) for 360° Spin. It produces a cleaner rotation.
**2. Why doesn't my video show the action I described in my prompt or script?**
**A.** Your uploaded image becomes the starting frame of the video. If your script or prompt describes something that's already visible in that image (for example, a hand that's already in frame), the video won't animate that action from scratch. Describe what should happen from the starting frame forward, not what's already present in it.
**3. What aspect ratio should my source image be?**
**A.** Use a 9:16 or 16:9 image where possible. Square (1:1) images can result in letterboxing (black bars) around the video. If your image is the wrong ratio, expand or crop it before generating your video.
**4. Can I upload real human photos instead of using an avatar?**
**A.** No. Real, identifiable human photos aren't supported as standard media references. Use the Avatars library instead — either a preset avatar or one you create from your own uploaded profile photos.
**5. Can I control what music plays in my video?**
**A.** Yes. You can upload your own audio (up to 15 seconds) or choose from the built-in audio library. You can also generate the video without audio and add your own background music after downloading it. This avoids occasional audio-generation errors.
---
**Still need help?** Reach out to our support team at [help@wizcommerce.com](https://mail.google.com/mail/u/0/?fs=1&to=help@wizcommerce.com&tf=cm).
- [Getting started](https://knowledge.wizcommerce.com/getting-started#main-content)
- [Product Overview](https://knowledge.wizcommerce.com/getting-started#product-overview)
- [Key Concepts You Should Know](https://knowledge.wizcommerce.com/getting-started#key-concepts-you-should-know)
- [Product Guides](https://knowledge.wizcommerce.com/getting-started#product-guides)
- [Trade Show Checklist](https://knowledge.wizcommerce.com/getting-started#trade-show-checklist)
- [Product Search & Discovery](https://knowledge.wizcommerce.com/product-search-discovery#main-content)
- [AI Product Recommendations](https://knowledge.wizcommerce.com/product-search-discovery#ai-product-recommendations)
- [Filter and Navigate](https://knowledge.wizcommerce.com/product-search-discovery#filter-and-navigate)
- [Catalog](https://knowledge.wizcommerce.com/product-search-discovery#catalog)
- [Product Selection & Ordering](https://knowledge.wizcommerce.com/product-selection-ordering#main-content)
- [Orders](https://knowledge.wizcommerce.com/product-selection-ordering#orders)
- [Quotes](https://knowledge.wizcommerce.com/product-selection-ordering#quotes)
- [Cart](https://knowledge.wizcommerce.com/product-selection-ordering#cart)
- [Presentations](https://knowledge.wizcommerce.com/product-selection-ordering#presentations)
- [Wishlist](https://knowledge.wizcommerce.com/product-selection-ordering#wishlist)
- [Item History](https://knowledge.wizcommerce.com/product-selection-ordering#item-history)
- [Invoices](https://knowledge.wizcommerce.com/product-selection-ordering#invoices)
- [Customers & Accounts](https://knowledge.wizcommerce.com/customers-accounts#main-content)
- [Customer Relationship Management (CRM)](https://knowledge.wizcommerce.com/customers-accounts#customer-relationship-management-crm)
- [Inventory & Warehousing](https://knowledge.wizcommerce.com/inventory-warehousing#main-content)
- [Inventory availability](https://knowledge.wizcommerce.com/inventory-warehousing#inventory-availability)
- [Payments](https://knowledge.wizcommerce.com/payments#main-content)
- [Payment Dashboard](https://knowledge.wizcommerce.com/payments#payment-dashboard)
- [Pricing & Commercials](https://knowledge.wizcommerce.com/pricing-commercials#main-content)
- [Pricelist](https://knowledge.wizcommerce.com/pricing-commercials#pricelist)
- [Discounts & Promotions](https://knowledge.wizcommerce.com/pricing-commercials#discounts-promotions)
- [Claims & Credits](https://knowledge.wizcommerce.com/pricing-commercials#claims-credits)
- [AI Co-Workers](https://knowledge.wizcommerce.com/ai-co-workers#main-content)
- [Ella - AI Order Entry Assistant](https://knowledge.wizcommerce.com/ai-co-workers#ella-ai-order-entry-assistant)
- [WizPilot - AI Assistant](https://knowledge.wizcommerce.com/ai-co-workers#wizpilot-ai-assistant)
- [WizStudio](https://knowledge.wizcommerce.com/wizstudio#main-content)
- [Creating & Editing Images](https://knowledge.wizcommerce.com/wizstudio#creating-editing-images)
- [Lifestyle Generator](https://knowledge.wizcommerce.com/wizstudio#lifestyle-generator)
- [Silo Editor](https://knowledge.wizcommerce.com/wizstudio#silo-editor)
- [Bulk Silo Editor](https://knowledge.wizcommerce.com/wizstudio#bulk-silo-editor)
- [Asset Library (Assets)](https://knowledge.wizcommerce.com/wizstudio#asset-library-assets)
- [AI Image Expander](https://knowledge.wizcommerce.com/wizstudio#ai-image-expander)
- [Reports & Analytics](https://knowledge.wizcommerce.com/reports-analytics#main-content)
- [Business Reports](https://knowledge.wizcommerce.com/reports-analytics#business-reports)
- [Manage your WizCommerce (Admin)](https://knowledge.wizcommerce.com/manage-your-wizcommerce-admin#main-content)
- [Import / Export](https://knowledge.wizcommerce.com/manage-your-wizcommerce-admin#import-export)
- [Organizational Settings](https://knowledge.wizcommerce.com/manage-your-wizcommerce-admin#organizational-settings)
- [Product Management](https://knowledge.wizcommerce.com/manage-your-wizcommerce-admin#product-management)
- [Managing Your WizShop Website](https://knowledge.wizcommerce.com/manage-your-wizcommerce-admin#managing-your-wizshop-website)
- [Integration & Apps](https://knowledge.wizcommerce.com/integration-apps#main-content)
- [Marketing Integration](https://knowledge.wizcommerce.com/integration-apps#marketing-integration)
- [Integration Dashboard](https://knowledge.wizcommerce.com/integration-apps#integration-dashboard)
- [Help & FAQs](https://knowledge.wizcommerce.com/help-faqs#main-content)
- [Help with Orders](https://knowledge.wizcommerce.com/help-faqs#help-with-orders)
- [Help with Quotes](https://knowledge.wizcommerce.com/help-faqs#help-with-quotes)
- [Help with Presentation](https://knowledge.wizcommerce.com/help-faqs#help-with-presentation)
- [Help with Inventory](https://knowledge.wizcommerce.com/help-faqs#help-with-inventory)
- [Help with User Management](https://knowledge.wizcommerce.com/help-faqs#help-with-user-management)
- [Help with Pricelist & Discounts](https://knowledge.wizcommerce.com/help-faqs#help-with-pricelist-discounts)
- [Help with WizStudio](https://knowledge.wizcommerce.com/help-faqs#help-with-wizstudio)
- [Help with Ella](https://knowledge.wizcommerce.com/help-faqs#help-with-ella)
- [Help with Org Settings (Admin)](https://knowledge.wizcommerce.com/help-faqs#help-with-org-settings-admin)
- [Help with Emails](https://knowledge.wizcommerce.com/help-faqs#help-with-emails)
- [Help with Products](https://knowledge.wizcommerce.com/help-faqs#help-with-products)
- [Help with Import/Export](https://knowledge.wizcommerce.com/help-faqs#help-with-import-export)
- [Help with WizShop](https://knowledge.wizcommerce.com/help-faqs#help-with-wizshop)
- [Help with Integration](https://knowledge.wizcommerce.com/help-faqs#help-with-integration)
- [Help with Categories and Collections](https://knowledge.wizcommerce.com/help-faqs#help-with-categories-and-collections)
- [Help With Customers](https://knowledge.wizcommerce.com/help-faqs#help-with-customers)
- [Help with Trade Show](https://knowledge.wizcommerce.com/help-faqs#help-with-trade-show)
[](https://wizcommerce.com/)
[mailto:help@wizcommerce.com](mailto:help@wizcommerce.com)
Copyright © 2025, WizCommerce
```json
{
"@context" : "https://schema.org",
"@type" : "VideoObject",
"caption" : {
"@type" : "MediaObject",
"contentUrl" : "https://knowledge.wizcommerce.com/media-transcripts/366796733127/en.vtt",
"inLanguage" : "en",
"name" : "en Captions"
},
"contentUrl" : "https://47455261.fs1.hubspotusercontent-na2.net/hubfs/47455261/video_assets/366796733127/inherited/web_optimized.mp4",
"dateModified" : "2026-07-08T18:18:45.903Z",
"duration" : "PT15S",
"height" : 1080,
"name" : "Sofawebp",
"thumbnailUrl" : "https://47455261.fs1.hubspotusercontent-na2.net/hubfs/47455261/Sofawebp.mp4/medium.jpg",
"uploadDate" : "2026-07-08T18:18:34.734Z",
"width" : 1920
}
```