Pricelists control what your customers see and what they pay, each pricelist represents a pricing tier, such as Wholesale, Distributor, or VIP, and is assigned directly to customer accounts.
This article covers how to create a new pricelist, update individual product prices, add or remove products from a tier, and perform bulk pricing changes using Import/Export.
Platform: WizOrder & WizShop | Who is this for: Admins
To Get There: Organizational Settings > General Settings > Price Lists
Table of Contents
| Sections | Topics |
| A | Create a New Pricelist |
| B | Edit an Existing Pricelist |
| C | Bulk Update Pricelist Using Import/Export |
| D | When to Use Each Method? |
| F | FAQs |
Before You Begin
- Ensure you have Admin access before creating or editing pricelists.
- A pricelist with no products assigned shows an empty catalog to customers on that tier. Add products before assigning customers to the new pricelist.
- Always export the current pricelist before making any bulk changes. This gives you a clean, correctly formatted template and reduces the risk of import errors.
A. Create a New Pricelist
- Go to Organizational Settings from the left navigation.
- Open General Settings and click Pricelists.

- Click + Add New.

- Enter a name for the pricelist tier (e.g., "Distributor" or "VIP").


- Choose a creation method:
- Manual Entry: Add products and prices one by one using Product Management
- Import from Spreadsheet: Use Import/Export to add all products and prices at once
Note: A pricelist with no products assigned shows an empty catalog to customers on that tier. Make sure to add products before assigning customers to the new pricelist.
B. Edit an Existing Pricelist
1. Update a Product Price
Use this when you need to update pricing for one or a few products — for example, adjusting the price of a specific SKU after a cost change.
- Go to Product Tool from the left navigation.
- Find the product using the search bar or filters.

- Click on the product to open it.
- Go to the Pricing section.

- Click Edit next to the pricelist tier you want to update. For example, update the Wholesale tier to $60 and enter the new sales price.


- Click Save.
Note: Price changes take effect immediately. Existing orders retain the price at the time they were placed — changes are not retroactive. For bulk price updates across many products, use the import workflow instead.
2. Add or Remove Products to a Pricelist
Adding a product makes it immediately visible to all customers assigned to that tier.
- Go to Product Tool from the left navigation.

- Find the product using the search bar or filters.
- Click on the SKU ID of the product, or click the Edit icon in the Action column, to open it.
- Go to the Pricing section.

- Find the pricelist you want to update.
- Toggle the product on to include it in that pricelist, or toggle it off to remove it.

- To update the price for that tier, click Edit.


- Click Save.
Note: Removing a product from a pricelist does not delete it from WizCommerce — it only hides it from customers on that tier.
C. Bulk Update Pricelist Using Import/Export
Use Import/Export when you need to make bulk pricing changes across many products at once — faster and more accurate than editing prices one by one.
Steps to Perform Bulk Price Changes
- Go to Manage from the left navigation and click Import/Export.
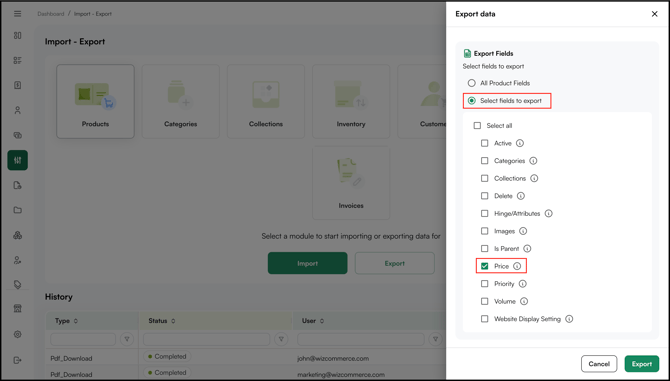
- Select the Products tab and click Export.
- Choose the Price field to export only pricing data.

- Open the exported file in Excel or Google Sheets. You'll find three tabs: Instructions, Sample, and Data Sheet. If this is your first time, read the Instructions tab before making any changes

- Go to the Data Sheet and make your updates. The Data Sheet contains the following columns for each pricelist tier:
- [Tier]_Include: Set to Y to make the product active and visible under that pricelist, or N to hide it from customers on that tier
- [Tier]_Base_Price: The standard price for the product on that tier
- [Tier]_Sale_Price: An optional sale price. When set, customers on that tier see the sale price instead of the base price.
- [Tier]_MOQ: Minimum Order Quantity — the minimum number of units a customer must order for this product
- [Tier]_IOQ: Incremental Order Quantity — the quantity increments a customer can order in (e.g., an IOQ of 6 means customers can order 6, 12, 18, and so on)
- [Tier]_Max Qty: The maximum number of units a customer can order in a single order

- Save the file once your changes are complete.
- Go back to Import/Export, select the Products tab, click Import, and select only the Price field.
- Upload the updated file.
D. When to Use Each Method?
Refer to the table below to determine the most efficient method for different pricing updates.
| Task | Recommended Method |
|---|---|
| Update 1–5 product prices | Edit directly using the product tool |
| Update pricing across many products | Export → Edit in Excel → Re-import |
| Create a new pricelist with many products | Organisational setting → Create pricelist → Import/export |
| Duplicate an existing tier with slight changes | Clone Existing → Edit as needed |
FAQs
1. Can I create a pricelist without adding products to it first?
A. Yes, but a pricelist with no products assigned shows an empty catalog to customers on that tier. Make sure to add products to the pricelist before assigning customers to it.
2. Do price changes apply to existing orders?
A. No. Price changes take effect immediately for new orders. Existing orders retain the price at the time they were placed — changes are not retroactive.
3. What happens to products I don't include in my bulk import file?
A. Products not included in the import file are left unchanged. The import only updates SKUs that are included in the Data Sheet.
Not finding what you need? Browse the WizCommerce Help Center, reach out to your Customer Success Manager, or contact our Support Team.