The Lifestyle Generator transforms a product photo into a styled, real-world scene in minutes. This article covers how to upload a product image, describe or select a scene, generate variations, and use the full editing suite, including prompt editing, expand, relight, line drawings, and downloading in multiple formats and resolutions.
Platform: WizStudio | Who is this for: Designers & Admins
Table of Contents
| Section | Topics |
| A | Generating Lifestyle Images |
| B | Edit a Generated Image |
| C | Save Images to Favorites |
| D | FAQs |
Before You Begin
- You must have access to WizStudio
- Have at least one product image ready to upload, a good-quality mobile photo works fine
- Adding product dimensions before generating is optional, but improves accuracy
A. Generating Lifestyle Images
Upload your product, describe a scene, and generate variations — the full workflow from start to image takes only a few steps.
Upload Your Product Image
-
Click Lifestyle Generator inside WizStudio.

-
Upload your product image.WizStudio automatically removes the background and assigns the product a category. If the category is incorrect, change it manually.

-
Optionally, add product dimensions for more accurate image generation.

Describe or Select a Scene
-
Click the Describe Scene box and type a custom scene description, or select from the AI-suggested scenes based on your product category


-
Click Generate Variations

-
WizStudio generates five variations for each scene. From here, you can select a different scene or proceed to edit a variation.

Enhance Scence
If you have a specific idea in mind, describe the key elements you want in the prompt box and click Enhance Scene. WizStudio generates a full scene prompt based on your inputs.
- Type the key elements you want in the prompt box.
- Click Enhance Scene, WizStudio generates a complete scene description based on your inputs.

- Review the prompt, make any necessary adjustments, and click Generate Variations.

Download or Edit Further
-
Click on any generated image to open it.
-
Choose your next action:
-
Full screen: View the image at full size
- Video: Generate Lifestyle video for the product
-
Heart icon: Add to Favorites
-
Set as theme: Use as a product theme
-
Three-dot menu: Access further editing options

-
B. Edit a Generated Image
Once you open a generated image, a set of editing tools becomes available on the left panel.

Edit:
The Edit panel provides the following tools:

-
Edit: Basic tools to adjust, refine, and retouch your image, including background removal, shadows, color corrections, and line drawings
-
AI Edit: Describe a change in plain language and let AI apply it to your image; for example, "change the wall color to beige"
-
AI Expand: Extend the image beyond its original frame by changing the aspect ratio, with AI filling in the additional space automatically
-
Relight Scene: Adjust the lighting conditions of your image using preset lighting styles, without changing the product itself
-
Resize and Move: Select and isolate a specific object or element within the image to move, edit, or remove it independently
There are multiple edits available in the edit section, namely: Remove Bg (removes background from product images), align & rotate, transform, shadows, color corrections, background, and line drawings.

Line Drawings
Line Drawings let you add precise dimension markers to your product image, useful for spec sheets, installation guides, and wholesale buyer reference.
-
Click Line Drawings and select a line type (pointed arrow, straight line, etc.)

-
Position the line on the product image
-
Set the unit of measurement from the dropdown (for e.g., cm)
-
To save a line drawing as a preset for reuse across other images, click the line drawing and then click the + icon.

-
To change a straight line to a dotted line, click Line Type in the top bar when the line is selected


-
Once done, your line drawing will be changed to a dotted line.

Compare Changes
Click the Compare icon at any point to view your edits side by side with the original image.


Downloading Your Image
-
Once all edits are complete, click Save
-
Click Download and select your preferred format: PNG, JPG, or WebP.

-
Select the resolution: 1K, 2K, 4K, or 8k
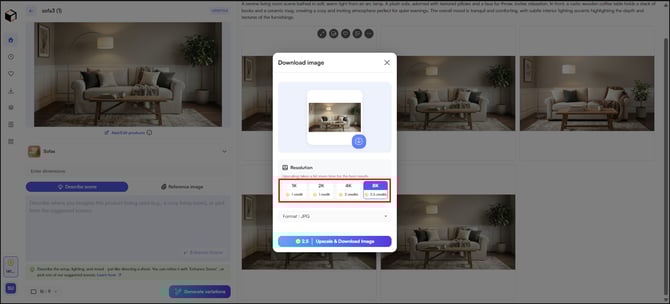
- Confirm and Download

Note: Image generation is unlimited; credits are only charged when you download. Resolution affects credit cost: 1K costs 1 credit; 4K costs 2 credits; 8k costs 2.5 credits.
C. Save Images to Favorites
Save generated images to your Favorites vault for quick access later. The Favorites section is accessible from the left sidebar on both the homepage and the editor page.


View an Image in Full Screen
- Click the arrow icon to open an image in full-screen mode. From here you can

- From full-screen view, you can:

- View the original image
- Compare it side by side with the generated version
FAQs
1. How many variations does WizStudio generate per scene?A. WizStudio generates five variations each time you click Generate Variations. If none of the results match your intent, refine your scene description and generate again.
2. Do I use credits every time I generate an image?
A. No. Credits are only charged when you download an image. Generation itself is unlimited. The resolution you choose at download determines the credit cost — 1K uses 1 credit and 4K uses 2 credits.
3. Can I reuse a line drawing I created on other product images?
A. Yes. Once you create a line drawing, click the + icon to save it as a preset. Saved presets are available to apply across other images inside WizStudio.
Not finding what you need? Browse the WizCommerce Help Center, reach out to your Customer Success Manager, or contact our Support Team.