This article covers how to add, edit, and manage individual products and their variants in WizCommerce, including updating descriptions, images, pricing, inventory settings, and attributes directly from the product management interface.
Platform: WizOrder & WizShop | Who is this for: Admins
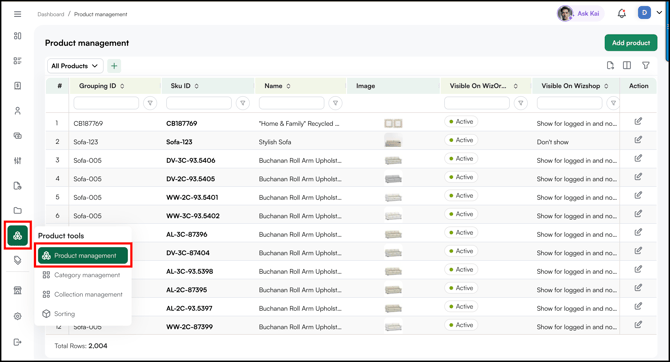
To Get There: Product Tools > Product Management > Add Product
Table of Contents
| Sections | Topics |
| A | Add a New Product |
| B | Edit an Existing Product |
| C | Create and Manage Product Variants |
| D | Manage Product Status |
| E | Add Custom Product Attributes |
| F | FAQs |
Before You Begin
- Ensure you have Admin access (Organizational Settings).
- Product Management is only accessible from the web portal — not from the Mobile App.
- If ERP integration is active, any changes you make will sync during the next scheduled cycle.
A. Add a New Product
- Go to Product Tools -- Product Management and click Add Product.

- Fill in the following fields:
- SKU: A unique alphanumeric identifier (e.g., CTL-2026-BLK)
- Product Name: The name of the product (e.g., Vase)
- Grouping ID: Select a Grouping ID if the product belongs to a group
- Reference ID: Enter the Reference ID

- Click Save. You are redirected to the product management page where you can complete the product setup across the following sections:
- Basic Details: Upload product images, silo shots, lifestyle images, and videos.

- Classification: Assign the product to the relevant category and classification.

- Attributes: Add product attributes.

- Pricing: Enable pricing tiers, and add base and sales price.

- Product Volume: Set the volume of the product.

- Variants: If the product has a Grouping ID, it automatically appears as a variant of the parent product. If not, no variants are shown.

- Channel Settings: Make the product visible across the Sales Rep App (WizOrder) and the Online Storefront (WizShop).

- Inventory: Configure inventory tracking, in-stock quantity, and back-order limit.

- Basic Details: Upload product images, silo shots, lifestyle images, and videos.
The product appears in the catalog for buyers whose price list includes it. If ERP integration is active, the product syncs during the next scheduled cycle.
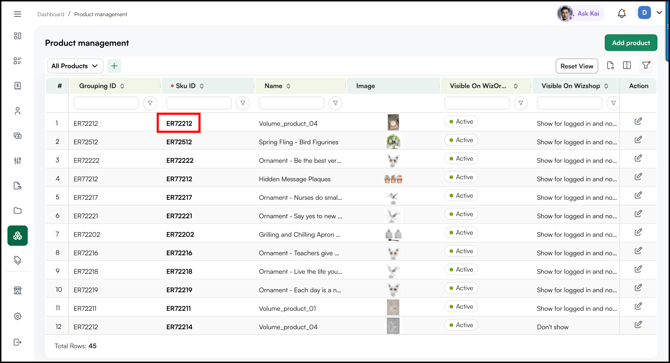
B. Edit an Existing Product
- Go to Product Management.
- Use the search bar or filters to find the product by SKU, name, or category.
- Click the product to open its product management page.

- Click the Edit icon next to any field you want to update — such as name, description, pricing, images, attributes, or inventory.

- Make your changes and click Save.
Note: Changes to pricing and inventory sync with your ERP during the next scheduled cycle, typically every 1 to 2 hours, depending on your configuration.
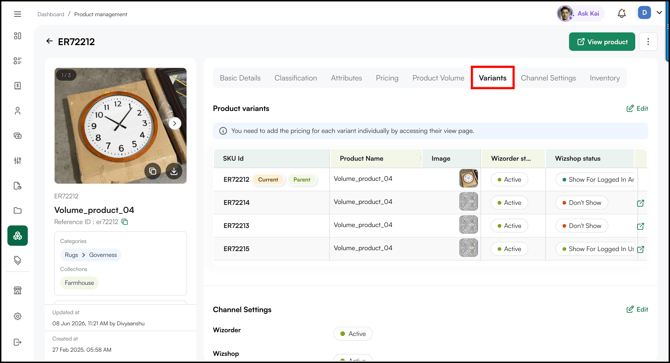
C. Create and Manage Product Variants
Variants are specific versions of a product defined by attributes like size, finish, or color. Each variant has its own SKU, inventory, and pricing.
- Open an existing product's management page.
- Navigate to the Variants section.

- Choose one of the following options:
» Generate Variants
- Click Generate Variants to open the Edit Variants panel.

- Click + Add Another Option.
- Select an attribute from the dropdown as the basis for the variant (e.g., Theme).

- Set the Display Type:
- Chip: Displays the variant as a text label (e.g., "Rustic Vibe")
- Image: Displays the variant as an image swatch
- Repeat to add more options if needed (e.g., Size and Color).
- Click Next when done.
- Type a value name for each option and click Add (e.g., "Rustic Vibe" and "Gold Plated" under Theme). A counter at the bottom shows how many variants will be generated based on your inputs.
- Click Generate Variants.

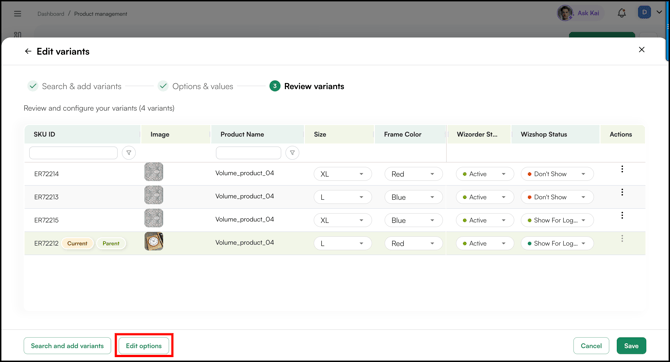
- On the Review screen, enter a SKU ID for each new variant. The original product SKU is marked as Current and Parent.
- Set the WizOrder Status and WizShop Status for each variant.
- Click Save Variants.

-
When you create a new variant, it becomes a separate product (SKU). Click to open the variant’s product management page and complete the setup, such as name, price list, volume, and inventory.

» Select & Add Existing Variants
- Search for the SKU ID you want to add as a variant.
- The system generates variant combinations automatically, each with a unique SKU.
- Set individual pricing for each variant if needed.
- Upload variant-specific images — each variant can have its own image set.
- Set inventory levels per variant.
- Click Save.
Note: A product with 3 sizes and 2 finishes generates 6 variants, each tracked separately while belonging to a single parent product. Products with variants appear in a stacked view in the product list, making them visually distinct from single-SKU products.
» Edit Product Variants (Hinges)
You can edit product variants by following the steps below:
- Go to Product Tools → Product Management.
- Select the Product whose variants you want to edit.
- Go to Variants tab.
- Click Edit.
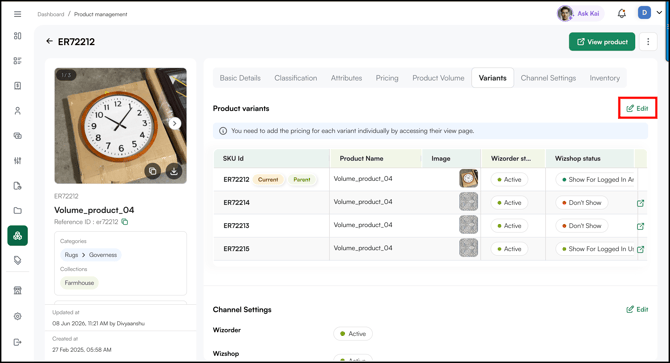
- Then click Edit Options to edit the product variants.
- You can Edit corresponding values or Delete existing variants as needed.
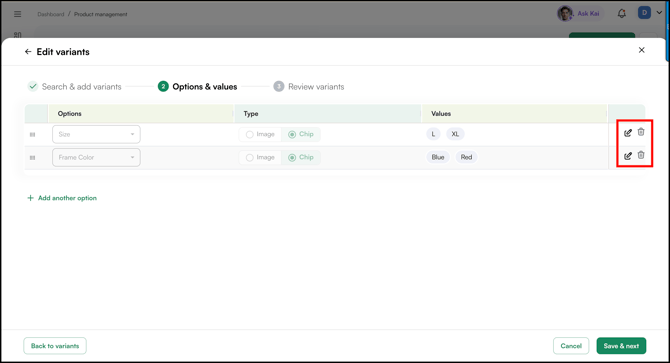
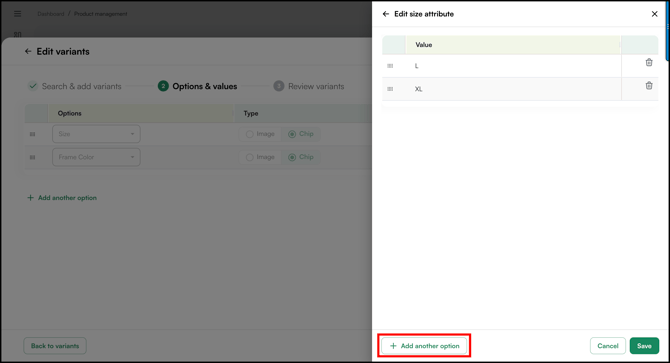
- For example, click on edit action menu to edit corresponding values of Size (variant).
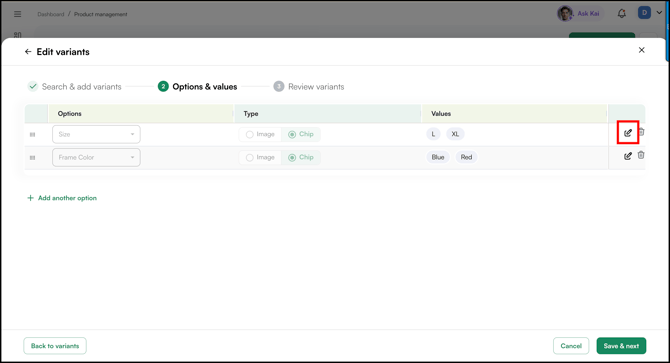
- Click + Add another option to add corresponding values and click Save. Click Delete Icon to delete existing values.
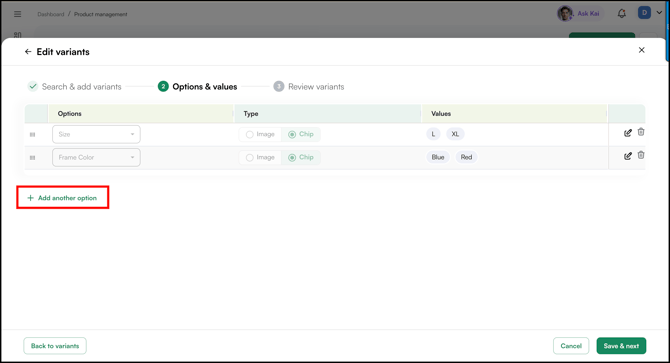
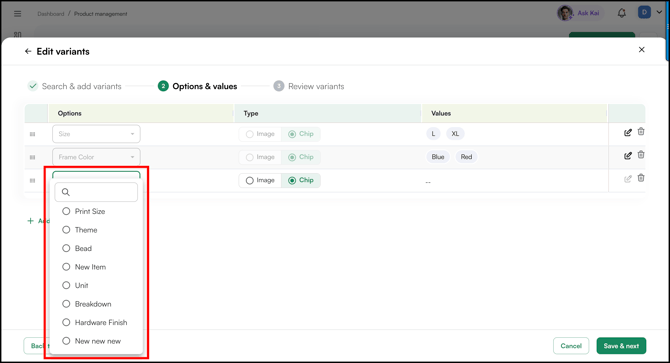
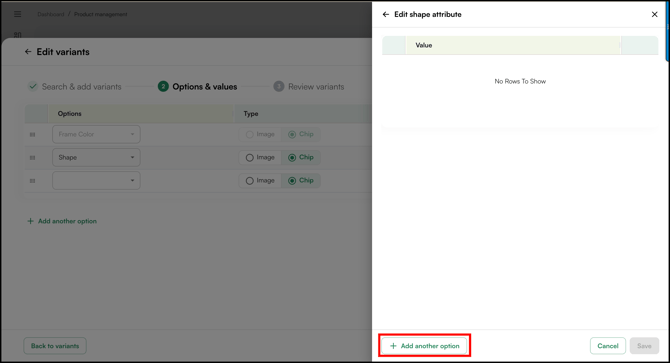
- To add new product variant, click + Add another option on the Edit Variants page.
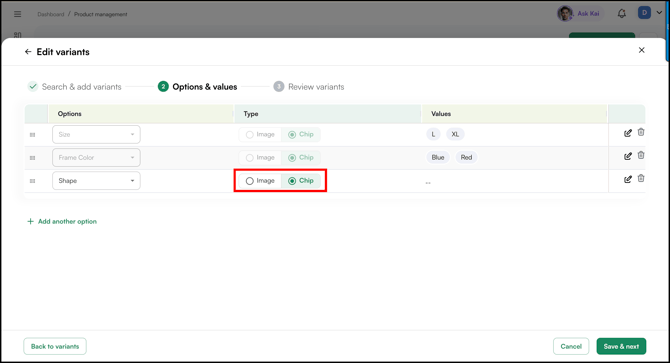
- Then select the Variant from the dropdown.
- Select the Type - Image or Chip.
- Then click on edit action menu to add corresponding values.
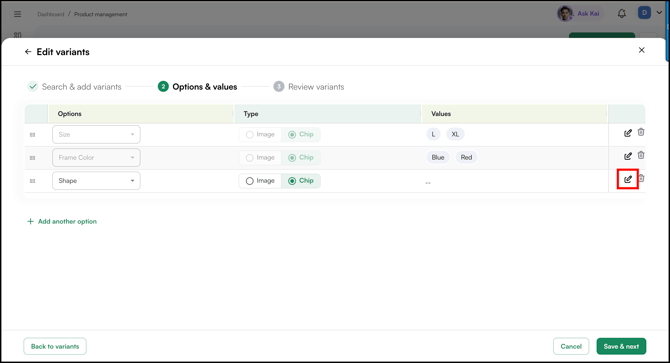
- Click + Add another option to add values of Shape (variant).
- Add values (for example, Round and Square) and click Save.
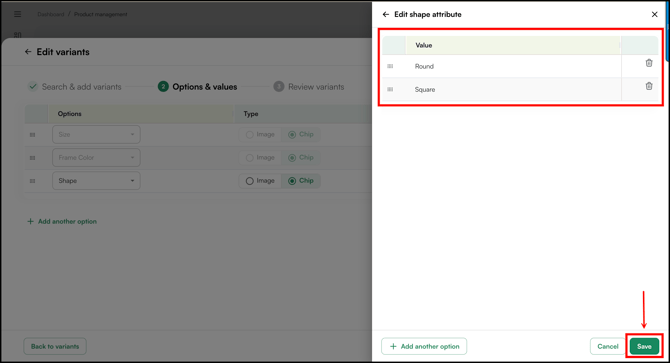
- Once saved, the newly added variant will appear. You can add multiple variants as well as edit or delete existing ones as needed.
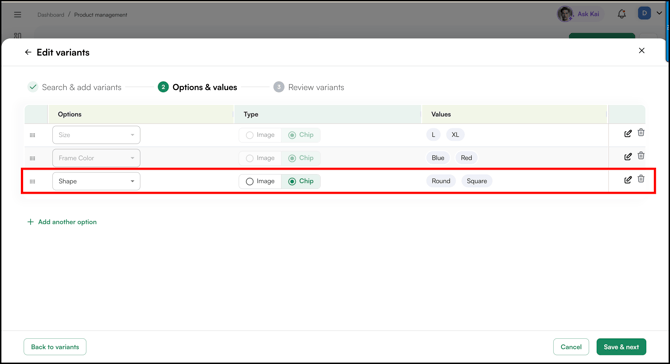
Note: Existing product variants (such as Size, Frame Color, and Shape) cannot be edited. However, you can add new variants, or edit and delete values within existing variants.
D. Manage Product Status
Product status controls visibility and availability across the platform.
| Status | What It Means |
|---|---|
| Active | Product is live and visible to buyers in their catalog |
| Inactive | Product exists in the system but is hidden from buyers |
| Discontinued | Product is no longer available for ordering |
- Open the Product management page.
- Go to Channel Settings.

- Select the appropriate status.
- Click Save.
Note: A product can be In Stock from an inventory perspective but set to Inactive so it does not appear in the catalog. Status and inventory are independent of each other.
E. Add Custom Product Attribute
Custom product attributes let you add new fields to the product details page, for example, Material, Special Feature, or Print Size. Any attribute you add here appears across all products in your catalog.
- Click Settings (gear icon) in the left navigation panel, click Organizational Settings, and under Product, click Product Details Page.

- On the Product Form and Rails page, click + Add Custom Attribute.

- In the Add Field panel, enter an Attribute Name, for example, Material.
- Select a data type for the attribute:
- Text: Single line text
- Text Area: Multi-line text
- URL: A web link
- Select: A single-choice dropdown
- Swatch: A visual swatch selector
- Multi Select: Multiple options from a list
- Multi Select Swatch: Multiple swatches
- Color: A color picker
- Image: An image upload
- HTML: Custom HTML content
- Dimensions: Height, width, and depth fields
- Set a default value if needed
- Click Create, the attribute appears immediately on all product detail pages.

- To edit or remove an existing attribute, use the edit and delete icons in the Actions column next to each attribute.

Note: If the Product setting is not visible under your Organizational Settings, it may not be enabled for your account. Contact your Customer Success Manager or reach out to our support team at help@wizcommerce.com to unable.
FAQs
1. Can I add a product without a Grouping ID?
A. Yes. The Grouping ID is only required if the product belongs to a group or has variants. If it's a standalone product, you can leave the Grouping ID empty.
2. What happens if I set a product to Inactive?
A. The product remains in the system but is hidden from buyers in their catalog. Setting a product to Inactive does not affect its inventory, the two are managed independently.
3. How long does it take for changes to sync with my ERP?
A. Changes to pricing and inventory sync during the next scheduled ERP cycle, typically every 1 to 2 hours, depending on your configuration.
4. How do I change a product code or SKU?
A. This depends on whether your account has an integration set up:
- Without Integration: You can edit the product SKU and other details within the platform.
- With Integration (ERP): Changes must be made in your ERP system. Once updated, the new SKU and product details will automatically reflect in the next sync cycle.
5. Why is a product SKU not appearing in WizOrder after I added it?
A. First check that the product status is Active and that it is assigned to the correct pricelist. If your account is integrated with an ERP, the product also needs a valid location or subsidiary mapping in your ERP, products missing this data may not sync correctly to WizCommerce. If the SKU still does not appear after the next sync, contact help@wizcommerce.com with the SKU, product name, and your ERP system.
Still need help? Reach out to our support team at help@wizcommerce.com.