The Customers section is where you create, find, review, and manage all the buyers your business works with, whether you're adding a new account, reviewing a returning buyer's profile, or managing inactive accounts.
This article covers how to create a new customer, search and filter the customer list, navigate the customer details page, edit account information, and delete customers.
Platform: WizOrder | Who is this for: Admins & Sales Rep
To Get There: Customers > Create Customer
Table of Contents
| Sections | Topics |
| A | Add a New Customer |
| B | Customer List and Search |
| C | Filter and Sort the Customer List |
| D | Customer Details Page |
| E | Edit Customer Details |
| F | Merge Customers |
| G | Delete Customer |
| H | FAQs |
Before You Begin
- Ensure you have the necessary access to create or edit customers in WizCommerce.
- If the customer is synced with an ERP, any changes you make will sync on the next scheduled cycle.
A. Add a New Customer
Create a New Customer
On the Mobile App
- Go to the Customers tab.
- Click Create Customer to open the customer creation form.

Quick Add (the default customer form): Lets you create a new customer immediately — ideal for trade shows where you need to capture an account quickly and fill in the remaining details later.
Fill in the following fields:
- Company Name: The business name that identifies this customer throughout the system
- Display Name: The name shown in lists, dropdowns, and search results
- Primary Contact: Name, email address, and phone number for the main point of contact
- Price List: Assign the customer to a pricing tier. Determines which prices they see.
- Billing and Shipping Address: The customer's official billing and shipping add

Add Optional Details (Optional but recommended):
- Payment Terms: Default terms for this account (e.g., Net 30, Net 60, COD, Prepaid)
- Website User: Give access to your Online Storefront by adding required details (name, email ID, phone number)
- Mode of Payment: Default payment method for this account
- Other Details: Upload any business cards, brochures, etc.

On the Web Portal
- Go to the Customers tab.
- Click Create Customer to open the customer creation form.

Quick Add (the default customer form): Lets you create a new customer on the spot — ideal for trade shows where you need to capture an account quickly and fill in the remaining details later.
Fill in the following fields:
- Company Name: The business name that identifies this customer throughout the system
- Display Name: The name shown in lists, dropdowns, and search results
- Primary Contact: Name, email address, and phone number for the main point of contact
- Price List: Assign the customer to a pricing tier. Determines which prices they see.
- Billing and Shipping Address: The customer's official billing and shipping address

Add Optional Details (Optional but recommended):
- Payment Terms: Default terms for this account (e.g., Net 30, Net 60, COD, Prepaid)
- Mode of Payment: Default payment method for this account
- Other Details: Default carrier and shipping preference


Where you can add customers:
- WizOrder: Reps can create customers on the fly during trade shows, showroom visits, or field calls.
- WizShop: Customers can request an account through the storefront registration form, it enters an approval queue.
- Bulk import: Upload multiple customers at once via CSV file.
- ERP sync: Customers created in your ERP sync automatically.
Tip: The customer details page shows who created the customer, when they were created, and when the details were last updated.
On the mobile app

On the Web Portal

B. Customer List and Search
1. Search for a Customer
Use the search bar to find customers by company name, contact name, address, phone number, or customer ID.
The search bar in WizOrder is universal, it searches across all customer attributes including name, address, and phone number from a single field. On the web portal, each column has its own search bar, letting you search within a specific attribute directly.
On the Mobile App

On the Web Portal

C. Filter and Sort the Customer List
The Customers tab contains all customer accounts in WizCommerce, whether created by a rep in WizOrder or approved through WizShop. It is available on both the mobile app and web portal, with slight differences in layout and available columns.
On the Mobile App

On the Web Portal
Tip: The First order created and Last order created columns show the date and time of each customer's first and most recent order. A dash (--) means the customer has not placed any orders yet.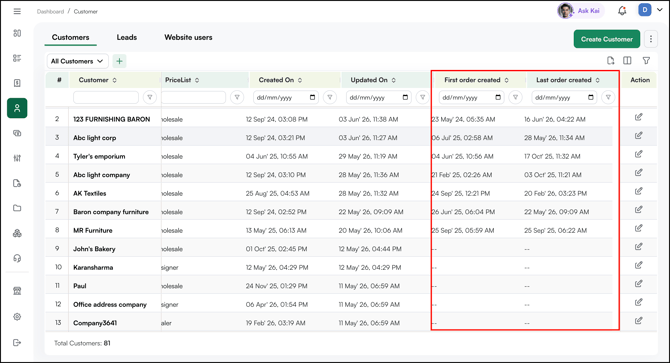
D. Customer Details Page
Click on any customer name to open their full profile. From here, review all account information, activity, and history in one place.

Left Panel: Account Information
This panel shows all key details for the customer account at a glance:
- Customer ID: Unique system identifier for this account (e.g., C_00498)
- Pricelist: The pricing tier assigned to this customer (e.g., Wholesale)
- Sales Rep: The rep assigned to manage this account
- Name: Primary contact name
- Phone and Email: Contact details for the account
- Reference ID: External reference ID if mapped to an ERP or third-party system
- Is Taxable: Indicates whether tax applies to this account
- Payment Terms: Default payment terms for this account (e.g., 50% Deposit)
- Payment Method: Shows the saved payment method or prompts to collect payment, authorise a card, or add credits
- Updated On / Created On: Timestamps showing when the record was last modified and when it was first created

Right Panel: Sales Activity
Tabbed Navigation:
- Sales: Orders, quotes, drafts, abandoned carts, invoices, payments, and credits
- Activity: Interaction history
- Tasks: Assigned tasks and follow-ups for this account
- In-Person Visit: Log and view visit history
- Notes: Internal notes attached to this account
- Product Insights: AI-powered insights on product performance and buying patterns for this customer
- Profile: Full account settings including pricing, payment terms, and rep assignment

Analytics Section:
A quick snapshot of the customer's performance:
- Total Revenue: Lifetime revenue generated from this account
- Total Orders: Total number of orders placed
- Total Quotes: Total number of quotes created
- Drafts: Number of orders saved as drafts
- Abandoned Carts: Carts started but not converted to an order or quote

Recent Transactions:
Displays all transactions associated with this customer — such as orders, quotes, drafts, invoices, payments, and credits. Each row shows the Reference ID, Type, Status, Payment Status, and available actions. Click any row to open the full detail page.

E. Editing a Customer
From the Customer Tab
On the Web Portal
- Go to the Customers tab.
- Click the Action column for the customer you want to edit.

- Make your changes. You can update:
- Contact information (name, email, phone)
- Billing and shipping addresses
- Sales representative assignment (admin access required)
- Assigned price list (admin access required)
- Payment terms or credit limits
- Custom fields
- Internal notes

Note: Changes take effect immediately. If the customer is synced with an ERP, updated fields sync on the next scheduled cycle.
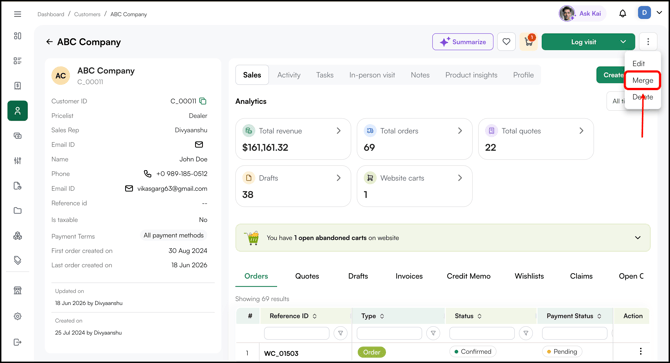
F. Merge Customers
The Merge feature allows you to combine two customer records into a single unified profile in case of a duplication. This is useful for cleaning up duplicate entries and consolidating order history, contacts, and other data under one primary customer record.
Use the Merge feature when you have duplicate customer accounts, for example, the same company was created twice under slightly different names, and you want to consolidate their data without losing any history.
Step 1: Open the Merge panel
Go to Customers and click All Customers.

Click the three-dot menu (⋮) and then select Merge.

Note: You can also merge customers directly from a customer's profile. Open the Customer Details Page of the customer you want to merge, click the three-dot menu, and then click Merge. The same merge flow applies from here.
Step 2: Select the customers to merge
A side panel titled Select a lead or customer will appear, showing all customers. You can switch between the Leads and Customers tabs depending on which type of record you want to merge. Use the search bar to find specific records quickly.

Check the boxes next to the two records you want to merge, then click Next.


Step 3: Choose the primary record
On the Merge screen, you will see both selected customers listed. Check the button next to the customer you want to keep as the Primary entity, this is the record that will survive after the merge. The other customer's data (like Orders, Quotes, etc.) will be merged into it.

Note: A lead or an inactive customer/lead cannot be selected as the primary entity when merging.
Step 4: Configure entity group settings
Scroll down to the Entity Group section. For each data category linked with the duplicate customer, choose whether to Merge it into the primary record or Ignore it. The available categories are:
- Order & Quote: Merge all orders and quotes from the secondary record
- Contacts: Merge or ignore associated contacts
- Addresses: Merge or ignore saved addresses
- CRM (Activities, Tasks, Notes, Emails, Visits): Merge or ignore CRM activity history

Once you have configured your preferences, click Merge to complete the process.
After the Merge
A notification will appear confirming the merge is in progress/completed (e.g., "Merging 2 customers — ABC Company, ABC"). You can track the status in the Notifications panel. Once complete, the primary customer record will reflect the consolidated data based on your entity group selections.

Note: You can also merge a customer from the Customer Details page. Click here to learn how.
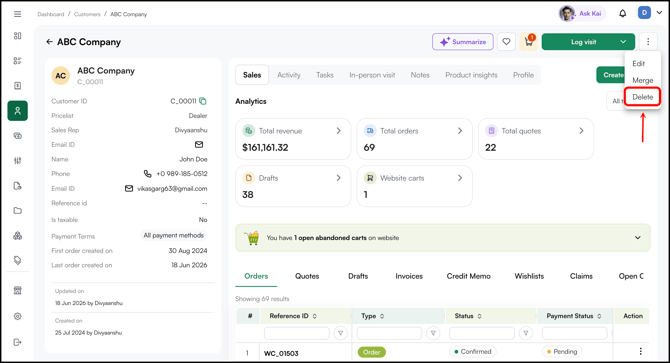
G. Delete Customer
Deleting a customer permanently removes their account and all associated records from WizCommerce. Use this when a customer account is no longer needed and you want to clear it out completely, including any linked orders, carts, and contacts.
- Open the Customer's Details Page.
- Select a Customer you want to delete.
- Click the three-dot menu at the top of the page.
- Click Delete.
- Click Yes, Delete to delete the customer and all associated data.
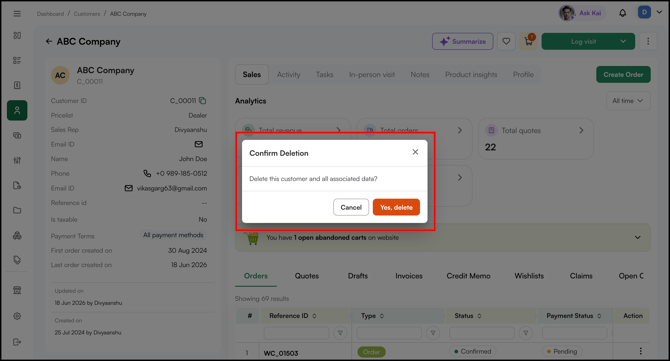
Note: Deleting a customer permanently removes their account and all associated records from WizCommerce.
FAQs
1. Can a sales rep create a customer, or is it admin, only?
A. Yes. Sales reps can create customers directly from WizOrder, on the mobile app or web portal, during trade shows, showroom visits, or field calls. Admin access is only required for actions like reassigning a sales rep or switching a price list.
2. What happens to a customer's data if they are synced with an ERP and I edit their details in WizCommerce?
A. Changes take effect immediately in WizCommerce. If the customer is synced with an ERP, the updated fields sync back on the next scheduled ERP cycle.
3. What happens to a customer's orders and data when I delete their account?
A. When deleting a customer, you have two options: you can permanently remove the customer along with all their associated data (orders, carts, contacts, etc.), or you can transfer their data to another customer account before deletion. The second option is useful when you want to preserve order history , for example, if an account was duplicated or a business is now operating under a new account.
4. Can I choose which data gets merged when combining two customer records?
A. Yes. During the merge process, you can configure what gets carried over into the primary record for each data category, including Orders & Quotes, Contacts, Addresses, and CRM activity (tasks, notes, emails, visits). For each category, you can choose to either merge it into the primary record or ignore it entirely.
Still need help? Reach out to our support team at help@wizcommerce.com.