Product modifiers are configurable add-on options that let buyers customise how a product is ordered, such as custom engraving, packaging options, or installation kits, without creating a separate SKU. This article covers how to create and attach modifiers to products.
Platform: WizOrder & WizShop | Who is this for: Admins
To Get There: Manage > Import/Export > Modifiers Setup
Note: Product modifiers are configured by admins only, from the web portal.
Table of Contents
Before You Begin
- Ensure you have Admin access before setting up modifiers.
- Modifiers do not create inventory records. If you need to track stock at the option level, use variants instead.
- Have your modifier groups, values, and pricing logic ready before starting the import.
A. When to Use Modifiers Instead of Variants
Use this table to decide which approach fits your product:
| Variants | Modifiers | |
|---|---|---|
| Creates a new SKU | Yes | No |
| Tracked in inventory | Yes | No |
| Best for | Simple, pre-defined options with a limited number of combinations, such as a rug available in 3 colors and 3 sizes | Complex customization with many possible combinations from a single base product |
| Example | 3 colors × 3 sizes = 9 SKUs | A chandelier with 7–8 option groups = 1,000+ combinations from one SKU |
B. How Modifiers are Structured
Modifiers follow a three-tier hierarchy:
- Modifier Group: The category of customisation, such as Frame Finish or Hardware Type. A single product can have multiple modifier groups.
- Modifier Values: The individual choices within a group, such as Brass, Chrome, or Matte Black under Frame Finish. Each option carries its own price adjustment.
- Price Adjustment: The amount added to or subtracted from the base product price when a specific option is selected.
The final line price is calculated as:
Base Product Price + Sum of All Selected Modifier Option Adjustments = Order Line Total
Note: When a modifier group allows multiple selections, you can control how the price adjustment is calculated. SUM adds all selected values together, MAX uses only the highest, MIN uses only the lowest, and AVG uses the average. For single-select groups, only SUM applies. You can also add a percentage margin on top — SUM(20), for example, totals all selected values and adds a 20% margin before applying it to the base price.
C. Display Types for Modifier Options
Display types control how modifier options appear to the buyer on the PDP. Available display types depend on the modifier type selected.
For Single Select modifiers:
- Chip: Small selectable buttons arranged in a row. Use for short lists of text-based choices, such as Red, Blue, Yellow, etc.

- Dropdown: A single-select dropdown menu. Use when the option list is long and screen space is limited.

- Radio Button: A vertical list of options with a radio button beside each. Use when you want each option clearly laid out and only one can be chosen at a time.

- Swatch: Image-based selection tiles showing visual previews, such as fabric swatches or material textures. Each option includes a thumbnail image.

For Multi-Select modifiers:
- Swatch: Image-based selection tiles. Multiple tiles can be selected simultaneously.

- Dropdown: A multi-select dropdown. Buyers can select more than one value from the list.

For Counter modifiers:
- Counter: A numeric input field with increment and decrement controls. No other display type applies.

For Text modifiers:
- Text Input: A free-text field where the buyer types in a custom value at the time of ordering. Use when you need the buyer to provide open-ended input, such as a name to engrave, a ribbon message, a design description, or a custom size. No other display type applies to Text modifiers.

Note: Control how many characters a buyer can enter using the Min Selection and Max Selection columns in the Modifier Definitions Sheet. WizCommerce recommends setting the maximum to 250 characters.
D. Understanding Modifier Sheets
The modifier import file has two sheets to work on — Modifier Definitions (Sheet 1) and Variant & Modifiers Mapping (Sheet 2).
Modifier Definitions (Sheet 1)
This is where you define all modifier groups and their individual options, including pricing, display settings, and any additional configuration.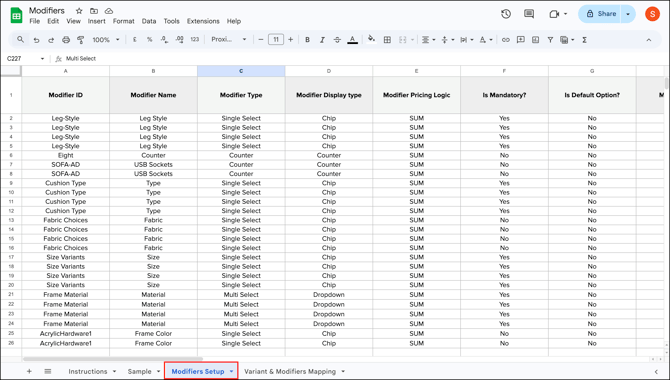
| Column | Description | Example |
|---|---|---|
| Modifier ID | Unique identifier for the modifier | MOD-001 |
| Modifier Name | The group name shown on the PDP | Hardware Finish |
| Modifier Type | Single Select, Multi Select, Counter, Single File, Multi File, or Text | Single Select |
| Modifier Display Type | Chip, Dropdown, Radio Button, Swatch, Counter, File or Text Input | Swatch |
| Modifier Pricing Logic | SUM, MAX, MIN, SKIP, AVERAGE or with margin e.g., SUM(20) | SUM |
| Is Mandatory | Yes or No | Yes |
| Min Selection | Minimum options required (Multi Select only) | 1 |
| Max Selection | Maximum options allowed (Multi Select only) | 3 |
| Disclaimer | Text shown to the buyer before selection | Lead time is 5–7 days for this option |
| Modifier Value | An individual option within the group | Antique Brass |
| Modifier Image URL | Image URL for Swatch options | https://... |
| Suffix Value | Appended to the base SKU for this option | -BR |
| Is Default Option | Yes or No; pre-selects this option on the PDP | No |
| Catalog Price | Price adjustment for this option per the price list | 150.00 |
| File Type | Accepted file types (File modifier only) | PDF, PNG |
| Max File Size (MB) | Maximum upload size in MB (File modifier only) | 10 |
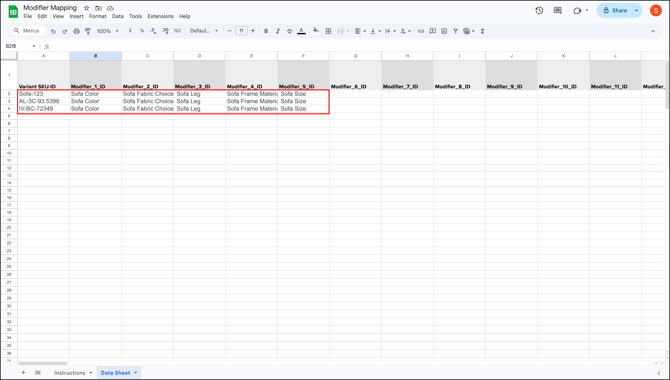
Variant & Modifiers Mapping (Sheet 2)
This is where you map the modifiers you defined in Sheet 1 to the products they should appear on, using the product's Grouping Identifier.
| Column | Description | Example |
|---|---|---|
| Parent ID | The product's Grouping Identifier | GRP-001 |
| Modifier 1–5 ID | Modifier IDs to assign to this product | MOD-001 |
Note: If customizations are not visible in your order PDFs, please contact our support team for assistance.
E. Set Up Modifiers in Bulk
For products with many modifier groups, or when applying the same modifiers across multiple products, use the Excel-based modifier import.
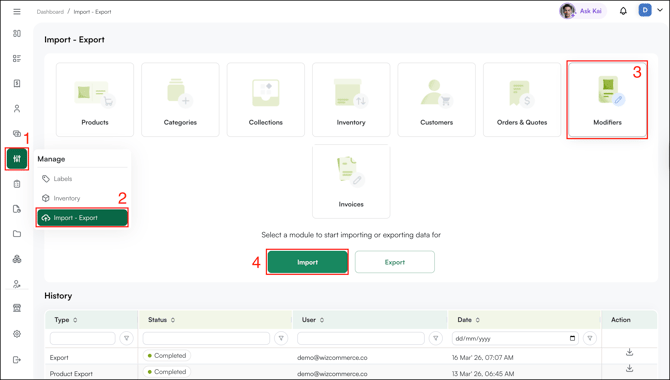
- Go to Manage → Import/Export.
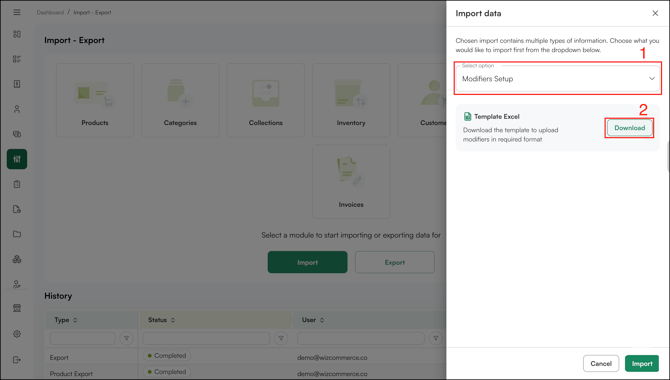
- Select Modifiers Setup from the dropdown, then click Modifier Import Template to download it. This is only required if you are setting up modifiers for the first time.
- Fill in the Modifier Definitions Sheet with your modifier groups and values. Here is an example for a sofa:
Modifier Group Modifier Type Display Type Options Sofa Fabric Choice Single Select Swatch Leather, Linen, Velvet Sofa Color Single Select Swatch Red, Brown, Purple Sofa Size Single Select Chip 3-Seater, 2-Seater, Loveseat Sofa Leg Style Single Select Radio Button Wooden Legs, Metal Legs Sofa Materials Single Select Dropdown Metal, Steel, Wood Sofa Cushion Type Single Select Radio Button Memory Foam, Spring, Polyurethane
You can also add more modifier groups — such as Arm Style, Back Style, Seat Depth, and Custom Engraving — depending on your product requirements. - Once the Modifier Setup sheet is complete, upload it using Import/Export.
- Download the Variant & Modifiers Mapping sheet. Enter your product's SKU alongside the IDs of the modifier groups you set up in step 3. You can map one product to as many modifiers as needed — for example, the sofa can be connected to all six modifier groups at once.
- Once both sheets are complete, upload them one at a time:
- Follow the video below to import the Modifier Setup Sheet.
- Follow the video below to import the Variant & Modifiers Mapping.
- Follow the video below to import the Modifier Setup Sheet.
- When the import is successful, the modifiers automatically appear on the relevant products and are ready for buyers to use.
F. Set Up Dependent Modifiers
Some modifier options depend on the buyer's earlier selections. When a buyer selects an option in one group, the next group updates automatically to show only the relevant choices for that selection.
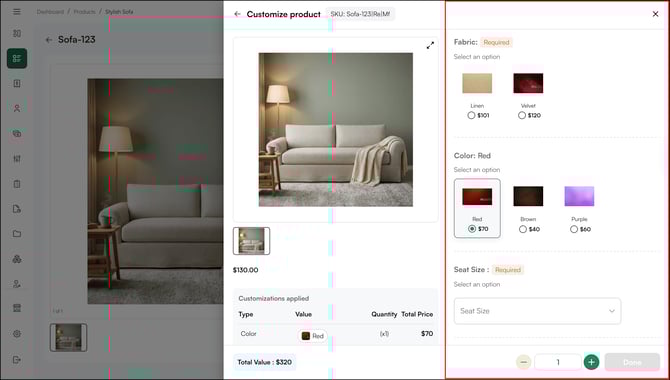
For example: A buyer may prefer a cushion material not listed in the standard options — such as Memory Foam, Polyurethane, or Spring. If they select Custom Cushion under Cushion Type, a text box appears for them to type in their preferred material. This way, buyers are not limited to available options and can specify exactly what they need.
How to Add a Dependent Modifier
- Create the parent modifier group Cushion Type and add your standard options: Memory Foam, Polyurethane, Spring, and Custom Cushion.
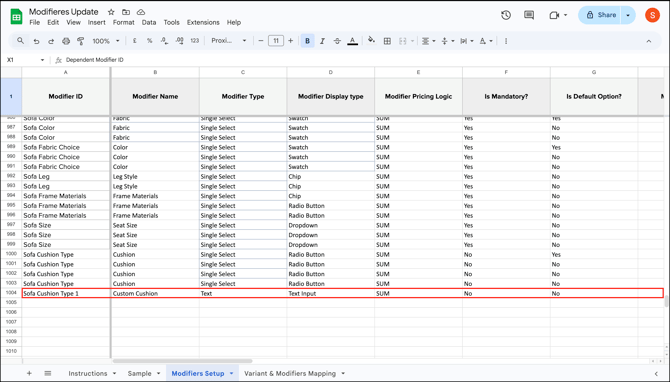
- For the Custom Cushion option, create a new Modifier ID (e.g., Sofa Cushion Type 1). Set the Modifier Type to Text and the Modifier Display Type to Text Input. This opens a text box on the PDP for buyers to type in their preferred cushion material.
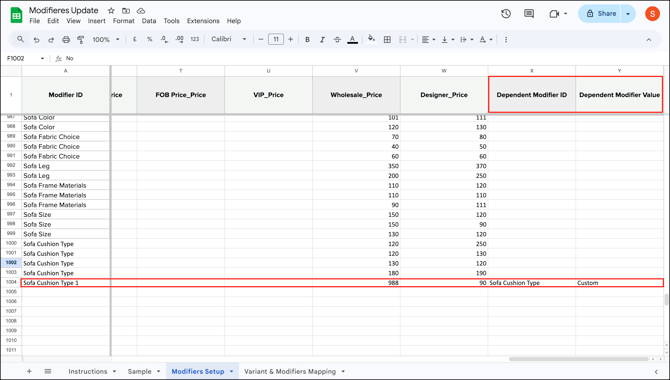
- In the Modifier Definitions Sheet, go to the Dependent Modifier ID column and enter the Modifier ID of the parent group, in this case, Sofa Cushion Type. Under Dependent Modifier Value, enter the specific option that triggers this dependency — in this case, Custom.
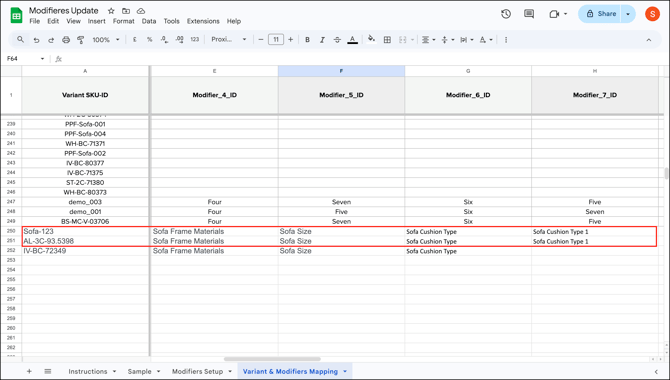
- Go to the Variant & Modifiers Mapping Sheet and map the new Modifier ID to the relevant SKU.
- Once both sheets are complete, upload them one at a time. The changes reflect on the product page once the import is successful.
G. Set up Partial Product Modifiers
A partial modifier update lets you add new values to an existing modifier or introduce a brand new modifier to your catalog, without rebuilding everything from scratch. If you are adding a brand new modifier, make sure to map it in the Variant and Modifier Mapping sheet after the import, otherwise the modifier will not appear on your products.
Add New Value to an Existing Modifier ID
Before adding new values, copy all existing values for that Modifier ID into your file first. Any value not included in the import will be removed from the modifier after the import completes.
-
Go to Manage → Import/Export→Modifiers → Export.

-
Download the sheet from the notification panel, and open your Modifier sheet in Excel or Google Sheets.

- For the new sheet, copy the Modifier ID you want to update. Add one row for each existing value, and fill in all columns for every row: Modifier Name, Type, Display Type, Pricing Logic, Is Mandatory?, Is Default Option?, Min Selection, Max Selection, Modifier Value, and Suffix Value.

- Create a new sheet in your file and name it after the modifier you are updating, for example, Frame Material. Copy all existing data for that Modifier ID into this sheet.

- Add a new row for each new value below the existing ones, fill in all columns using the same or different values, and enter the new Modifier Value and Suffix Value for each.

- Save the file and perform the regular import while selecting Modifier Setup from the drop down from the Modifiers section.
- Save the file and perform the regular import from the Modifiers section, once the import is complete, the new values appear immediately under the modifier on the product's Customize panel.

Note: After the import, only the values included in your file will appear under that Modifier ID. If any existing value is missing from the file, it will be removed from the modifier permanently. Always export the current modifier values first and use that as your base before adding new rows.
FAQs
1. Do modifiers affect inventory tracking?
A. No. Modifiers do not create inventory records. If you need to track stock at the option level, use variants instead.
2. Can I apply the same modifier group to multiple products?
A. Yes. Use the Variant & Modifiers Mapping sheet to map the same Modifier ID to as many products as needed. Each product can be connected to multiple modifier groups at once.
3. What happens if a buyer selects multiple options in a multi-select modifier group?
A. The price adjustment depends on the pricing logic you set — SUM adds all selected values, MAX uses only the highest, MIN uses only the lowest, and AVG uses the average. You can also add a percentage margin on top using the SUM(n) format.
Still need help? Reach out to our support team at help@wizcommerce.com.