
The Discount Engine lets admins create company-level discount rules that apply automatically across WizOrder (the Sales Rep App) and WizShop (Online Storefront), without requiring manual intervention on every order, making it ideal for planned campaigns like Black Friday, seasonal sales, or loyalty promotions.
This article covers how to access the Discount Engine, create customer and product segments, and stop or duplicate existing discounts.
Discounts can be created at two levels:
- Product Discount: Apply a discount to specific products, categories, or collections
- Cart Discount: Apply a discount when a cart reaches a certain order value threshold
Platform: WizOrder & WizShop | Who is this for: Admins
To Get There: Discount Engine (Left Navigation)
Table of Contents
| Sections | Topics |
| A | How to Access the Discount Engine |
| B | Create Customer Segments |
| C | Create Product Segments |
| D | How to Stop a Discount |
| E | FAQs |
Before You Begin
- Ensure you have Admin access to WizOrder.
- Discount configuration is only available in the web portal.
- Create your customer and product segments before building discount rules, your segments need to be ready to select when you configure eligibility during discount setup.
A. How to Access the Discount Engine
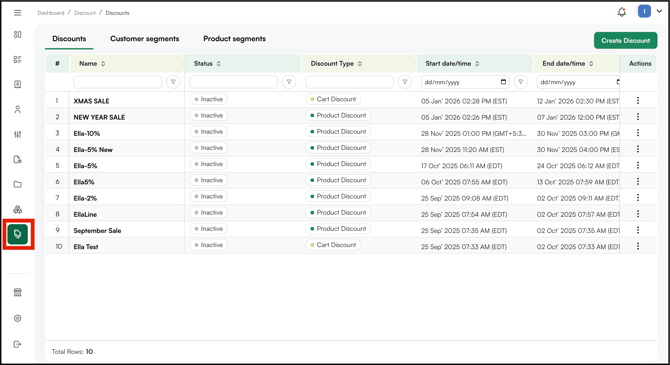
- Go to Discount Engine from the left navigation.
B. Create Customer Segments
Customer segments let you target specific groups of customers with discount rules. Once created, a segment can be selected as an eligibility condition when setting up a discount, so create your segments before building your discount rules.
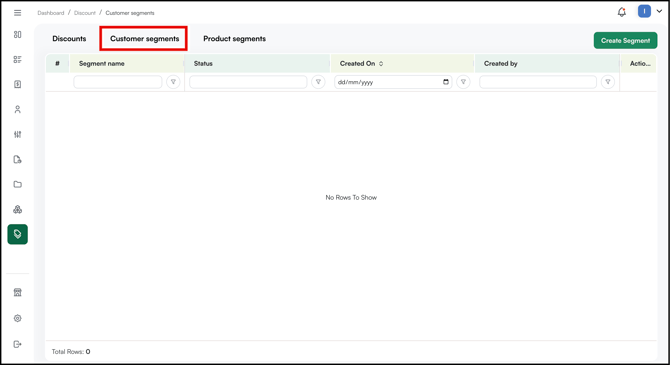
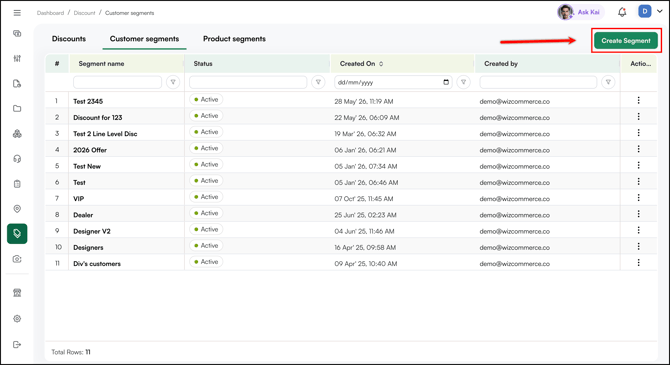
- Go to Customer Segment and click Create Segment.
- Enter a name and a unique code for the segment under Basic Details.
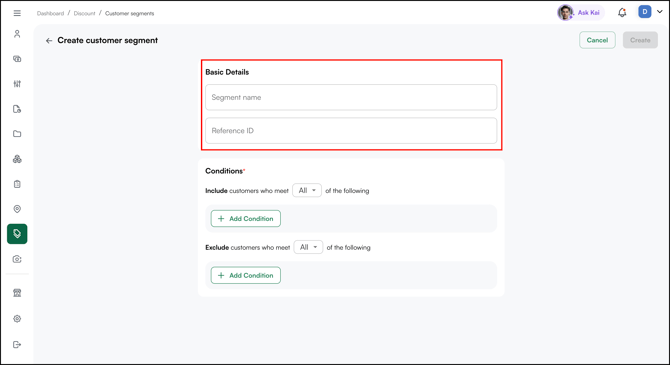
- Choose whether the discount applies when a customer meets any condition or all conditions.
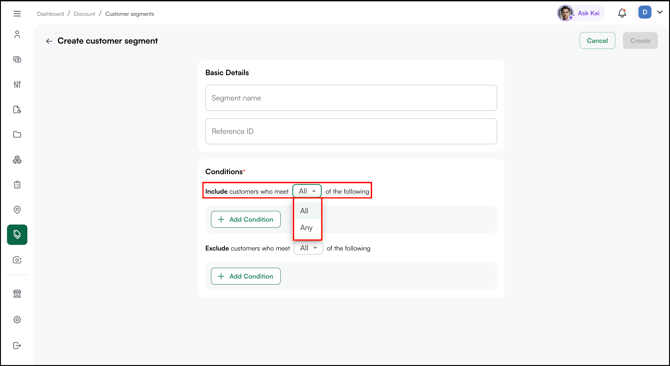
- Under Conditions, define which customers belong to this segment. You can add customers by:
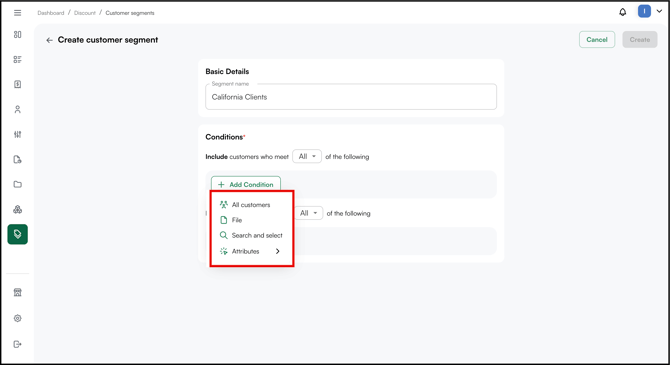
- All Customers: Includes your entire customer base
- File: Upload a list of customers
- Search and Select: Manually search for and add specific customers
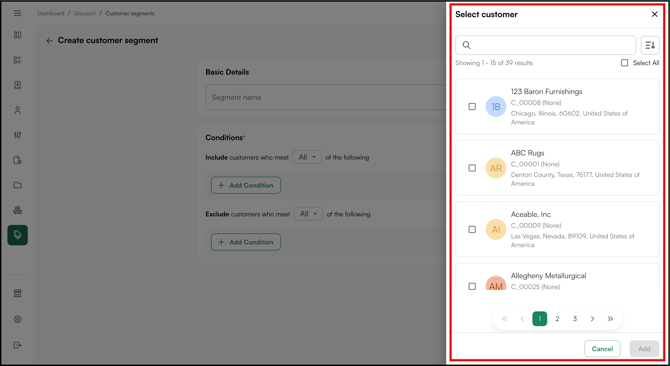
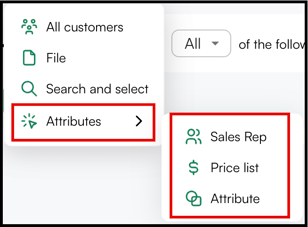
- Attributes: Filter by sales rep, price list, or customer attribute
- Choose how conditions are applied:
- Include All: Only customers who meet all conditions are added to the segment
- Include Any: Customers who meet any one of the conditions are added
- The same logic applies to Exclude All and Exclude Any
- Click Create in the top right corner.
Your customer segment is created and appears in the customer segment summary table.
C. Create Product Segments
Product segments let you target specific groups of products with discount rules, for example, applying a discount to an entire collection or category.
- Go to Product Segment and click Create Segment.
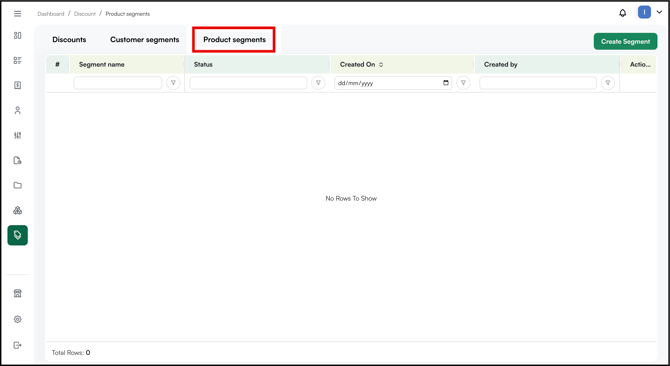
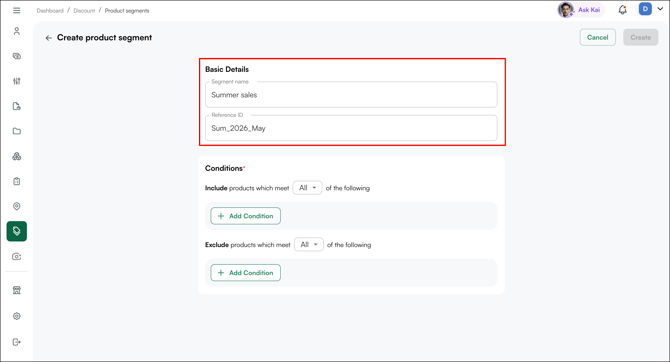
- Enter a name for the segment under Basic Details. And a Reference ID (unique alphanumeric code to track product segments).
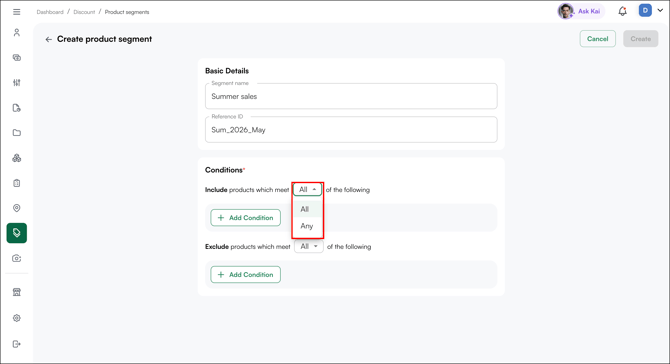
- Choose whether the discount applies when a customer meets any condition or all conditions.
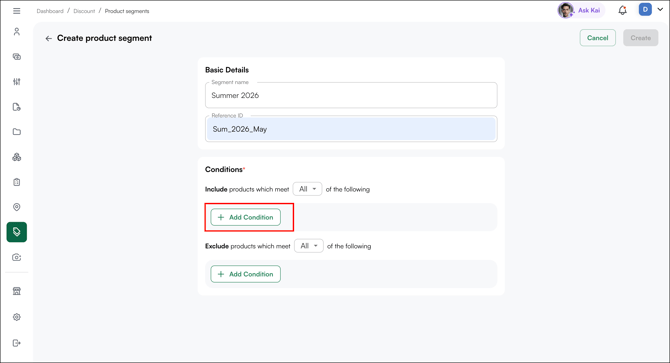
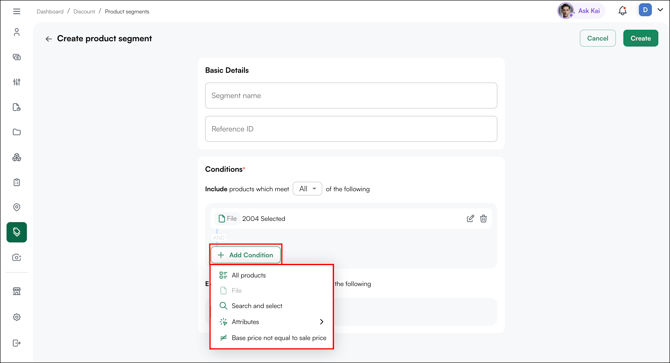
- Under Include product, click + Add Condition and define which products belong to this segment. You can add products by:
- All Products: Includes your entire product catalog
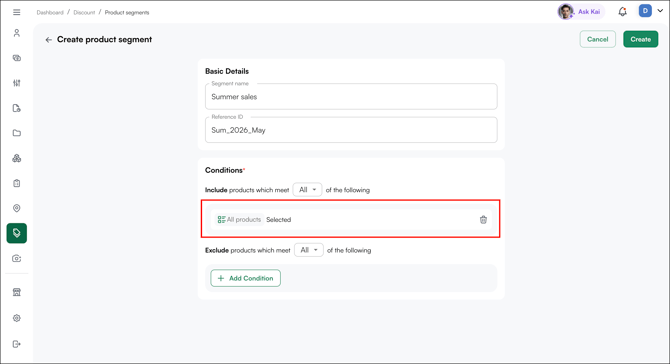
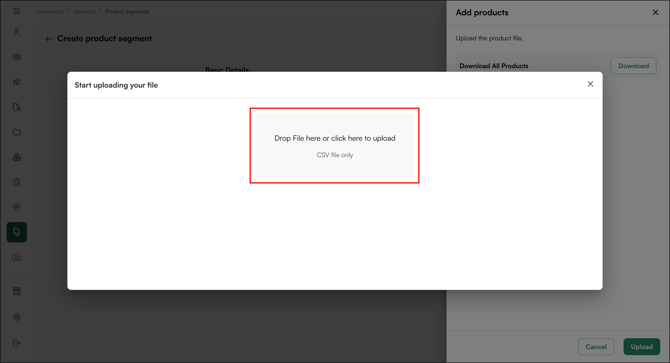
- File: Upload a list of products using a CSV file
- In the Add products panel, click Download next to Download All Products to get a pre-formatted file with your full product list.
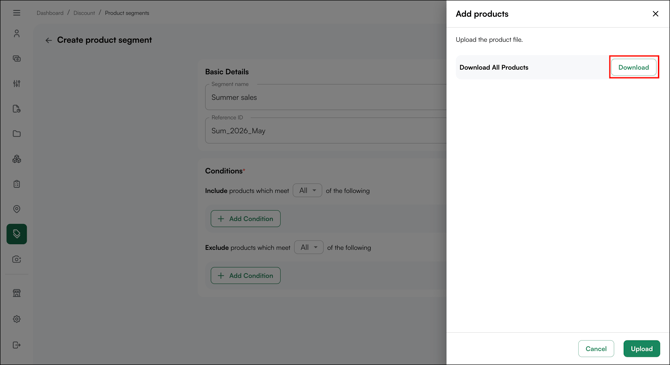
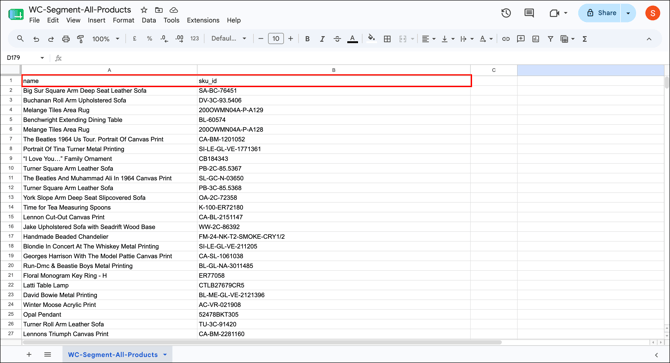
- Edit the file to include only the products (Name and SKU ID ) you want in this segment.
- Click Upload to import the file.
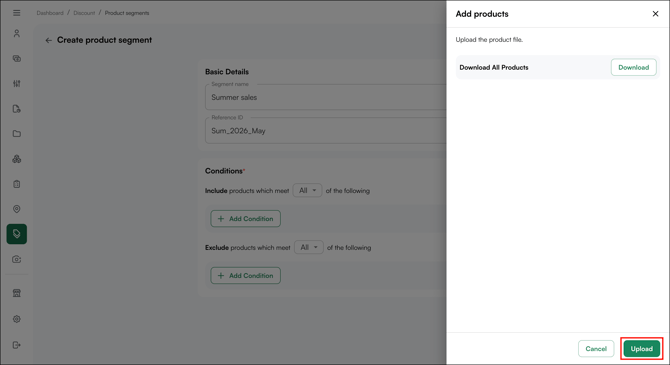
- Upload (only) CSV file from your computer with update product list.
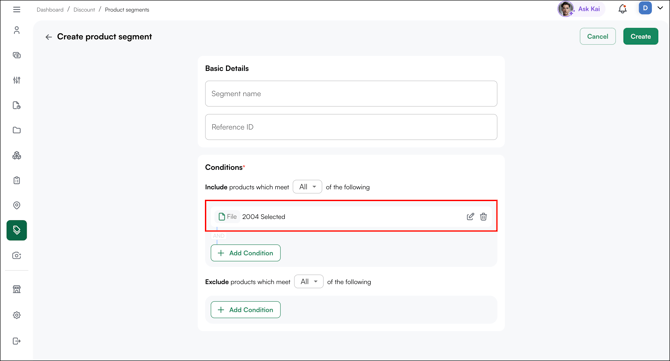
- You can add more than one condition to the same segment. After adding your first condition, click + Add Condition again to add another. Multiple conditions are combined using AND logic, meaning a product must meet all active conditions to be included in the segment.
- In the Add products panel, click Download next to Download All Products to get a pre-formatted file with your full product list.
- Search and Select: Manually search for and add specific products to the segment.
- In the Select product panel, search for products by name or SKU, or use the filters, Price, Inventory Status, Description, and Dimensions, to narrow down results.
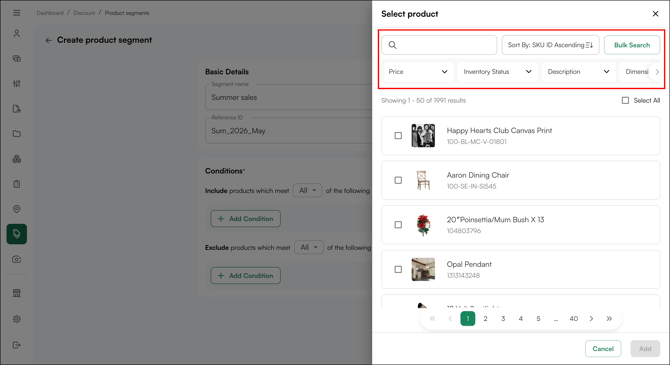
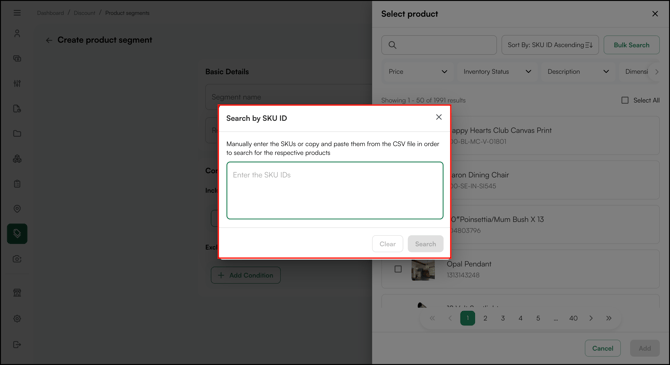
- To search by multiple SKUs at once, click Bulk Search, enter or paste the SKU IDs into the text field, and click Search.
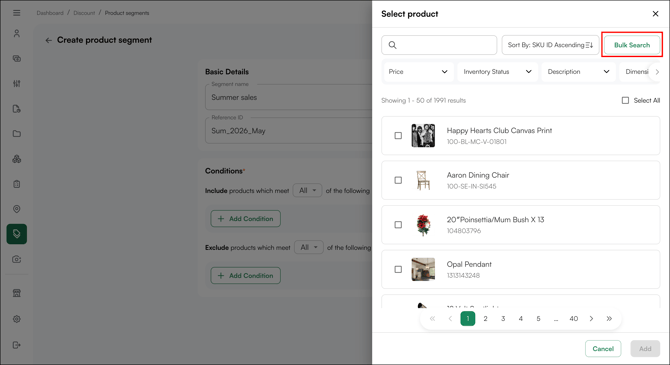
- In the Select product panel, search for products by name or SKU, or use the filters, Price, Inventory Status, Description, and Dimensions, to narrow down results.
- All Products: Includes your entire product catalog
-
-
- Type out SKUs to select in the bulk search and click search to add them.
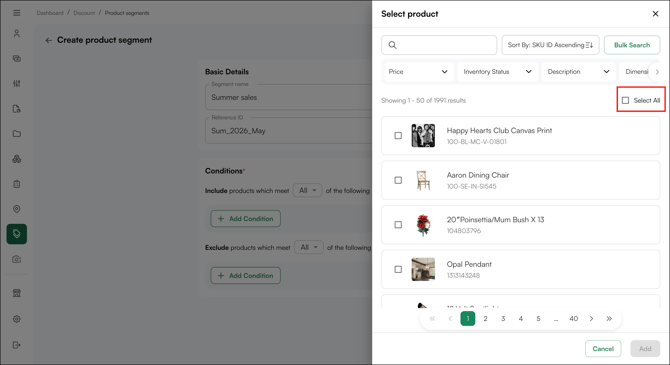
- Select the products you want to include. Click Select All to select all results (upto 50 entires) at once.
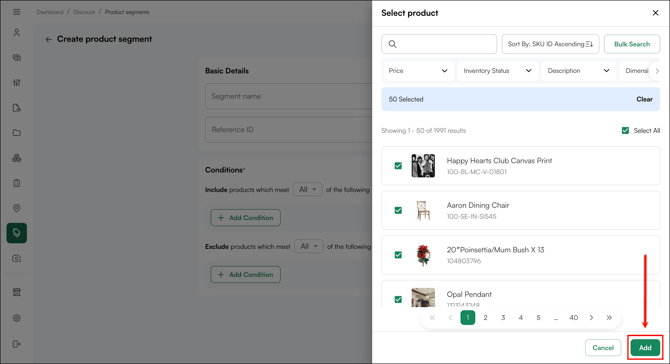
- Click Add to apply the selection.
- Type out SKUs to select in the bulk search and click search to add them.
- Attributes: Filter by category, collection, or any default or custom product attribute, including fields like color, size, material, or any attribute configured in your product catalog.
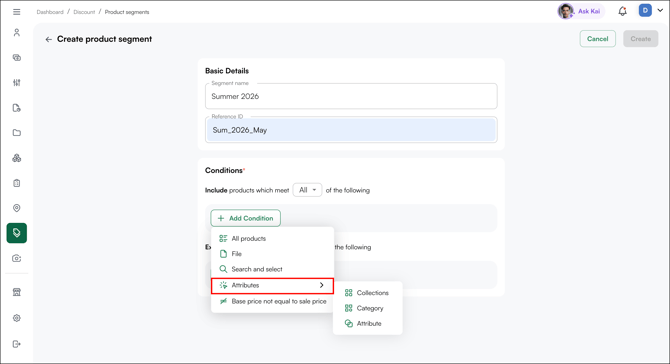
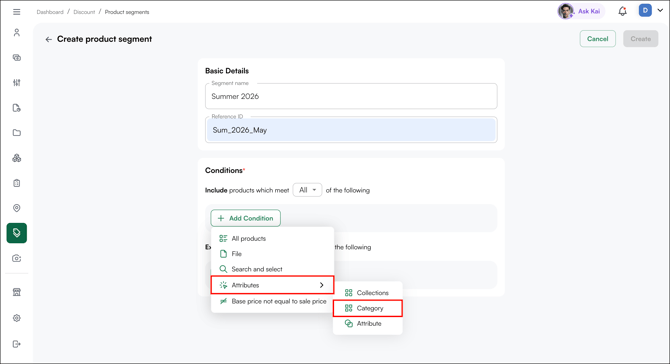
- Category: Filters products by their assigned category, the structural grouping of your catalog (for example, Apparel, Footwear, or Accessories). Selecting a category shows only the products that belong to it.
- Category: Filters products by their assigned category, the structural grouping of your catalog (for example, Apparel, Footwear, or Accessories). Selecting a category shows only the products that belong to it.
-
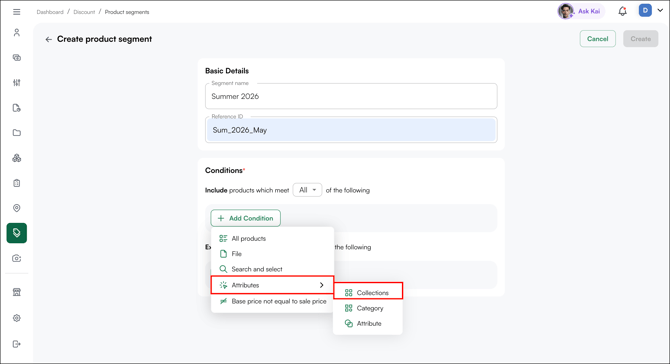
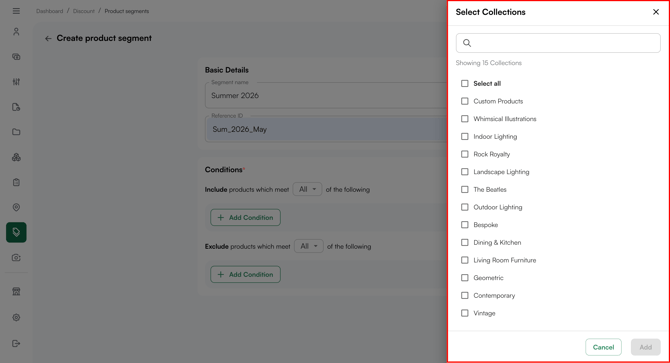
- Collection: Filters products by collection, a curated grouping that often spans multiple categories (for example, a "Summer 2026" or "New Arrivals" collection). Use this to view products grouped by theme, season, or campaign rather than by catalog structure.
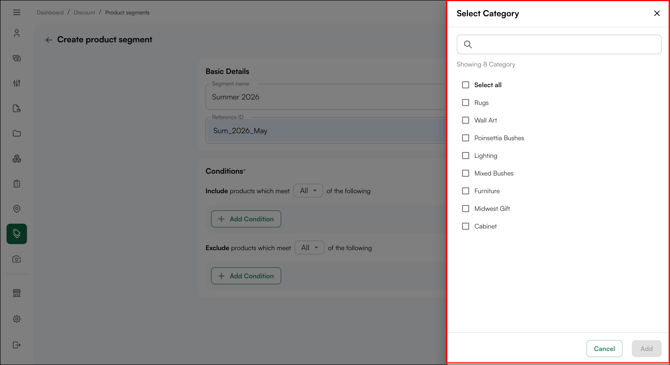
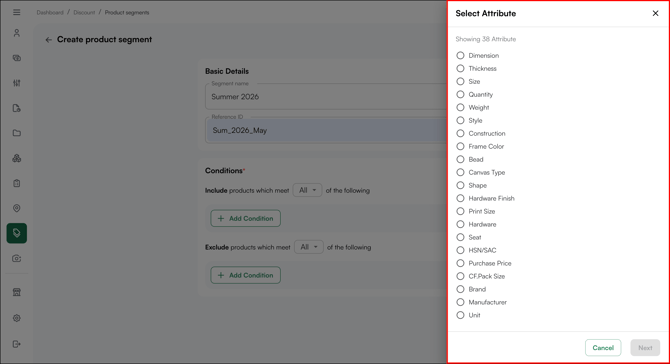
- Attributes: Pick the attribute you want to filter by, for example, color, size, or material. The side sheet shows all your attributes, both default and custom. Click to see how attribute based segmentation work and the full list of operators and when to use each.
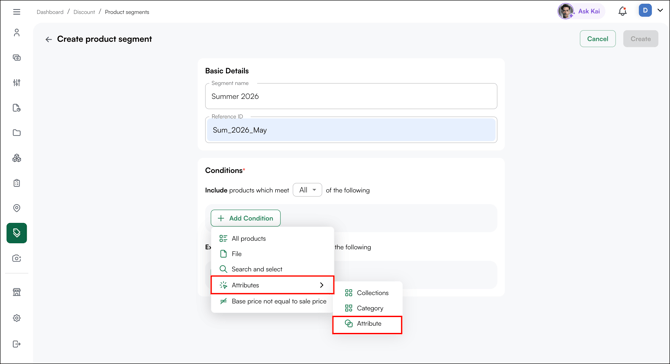
- Collection: Filters products by collection, a curated grouping that often spans multiple categories (for example, a "Summer 2026" or "New Arrivals" collection). Use this to view products grouped by theme, season, or campaign rather than by catalog structure.
-
-
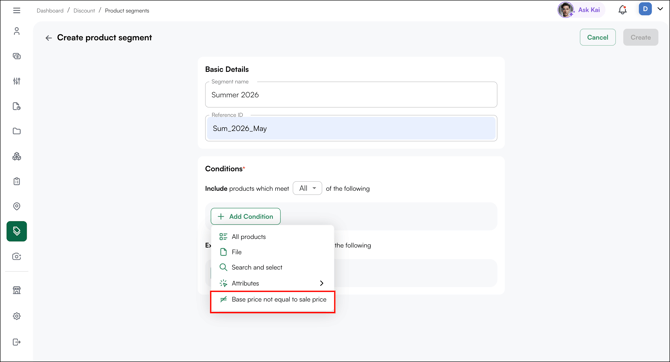
Base price not equal to sale price: Includes all products where the base price and sale price differ, useful for targeting products that are already on promotion
-
-
- For the Exclue products section, the same settings are available as the inlcude, use the same logic to exclude products from the product segment list Any product that matches your exclude conditions is left out of the segment, even if it also matches an include condition.
Filter Products by Attribute
Attribute conditions let you build a product segment around the specific characteristics of your products rather than selecting items one by one. You pick an attribute, choose an operator, and set a value, and every product that matches is pulled into the segment automatically.
This is useful when you want to target products by a shared trait, for example, all products in size small, all items tagged with a specific material, or every product that is not a particular color.
Note: Text values are not case-sensitive. Entering small, Small, or SMALL matches the same products. All match the same products, but the full value must match, for example, 100cm will not match products with a dimension of 100mm.
How to add an attribute condition
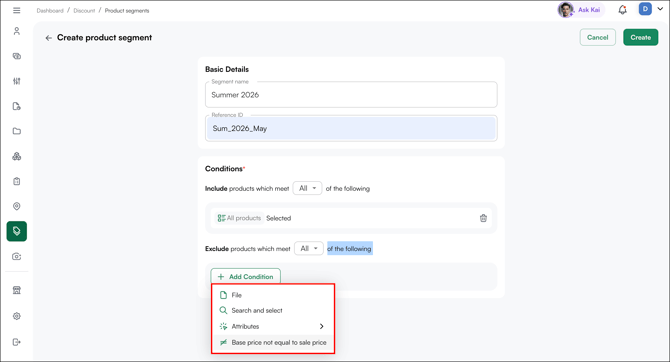
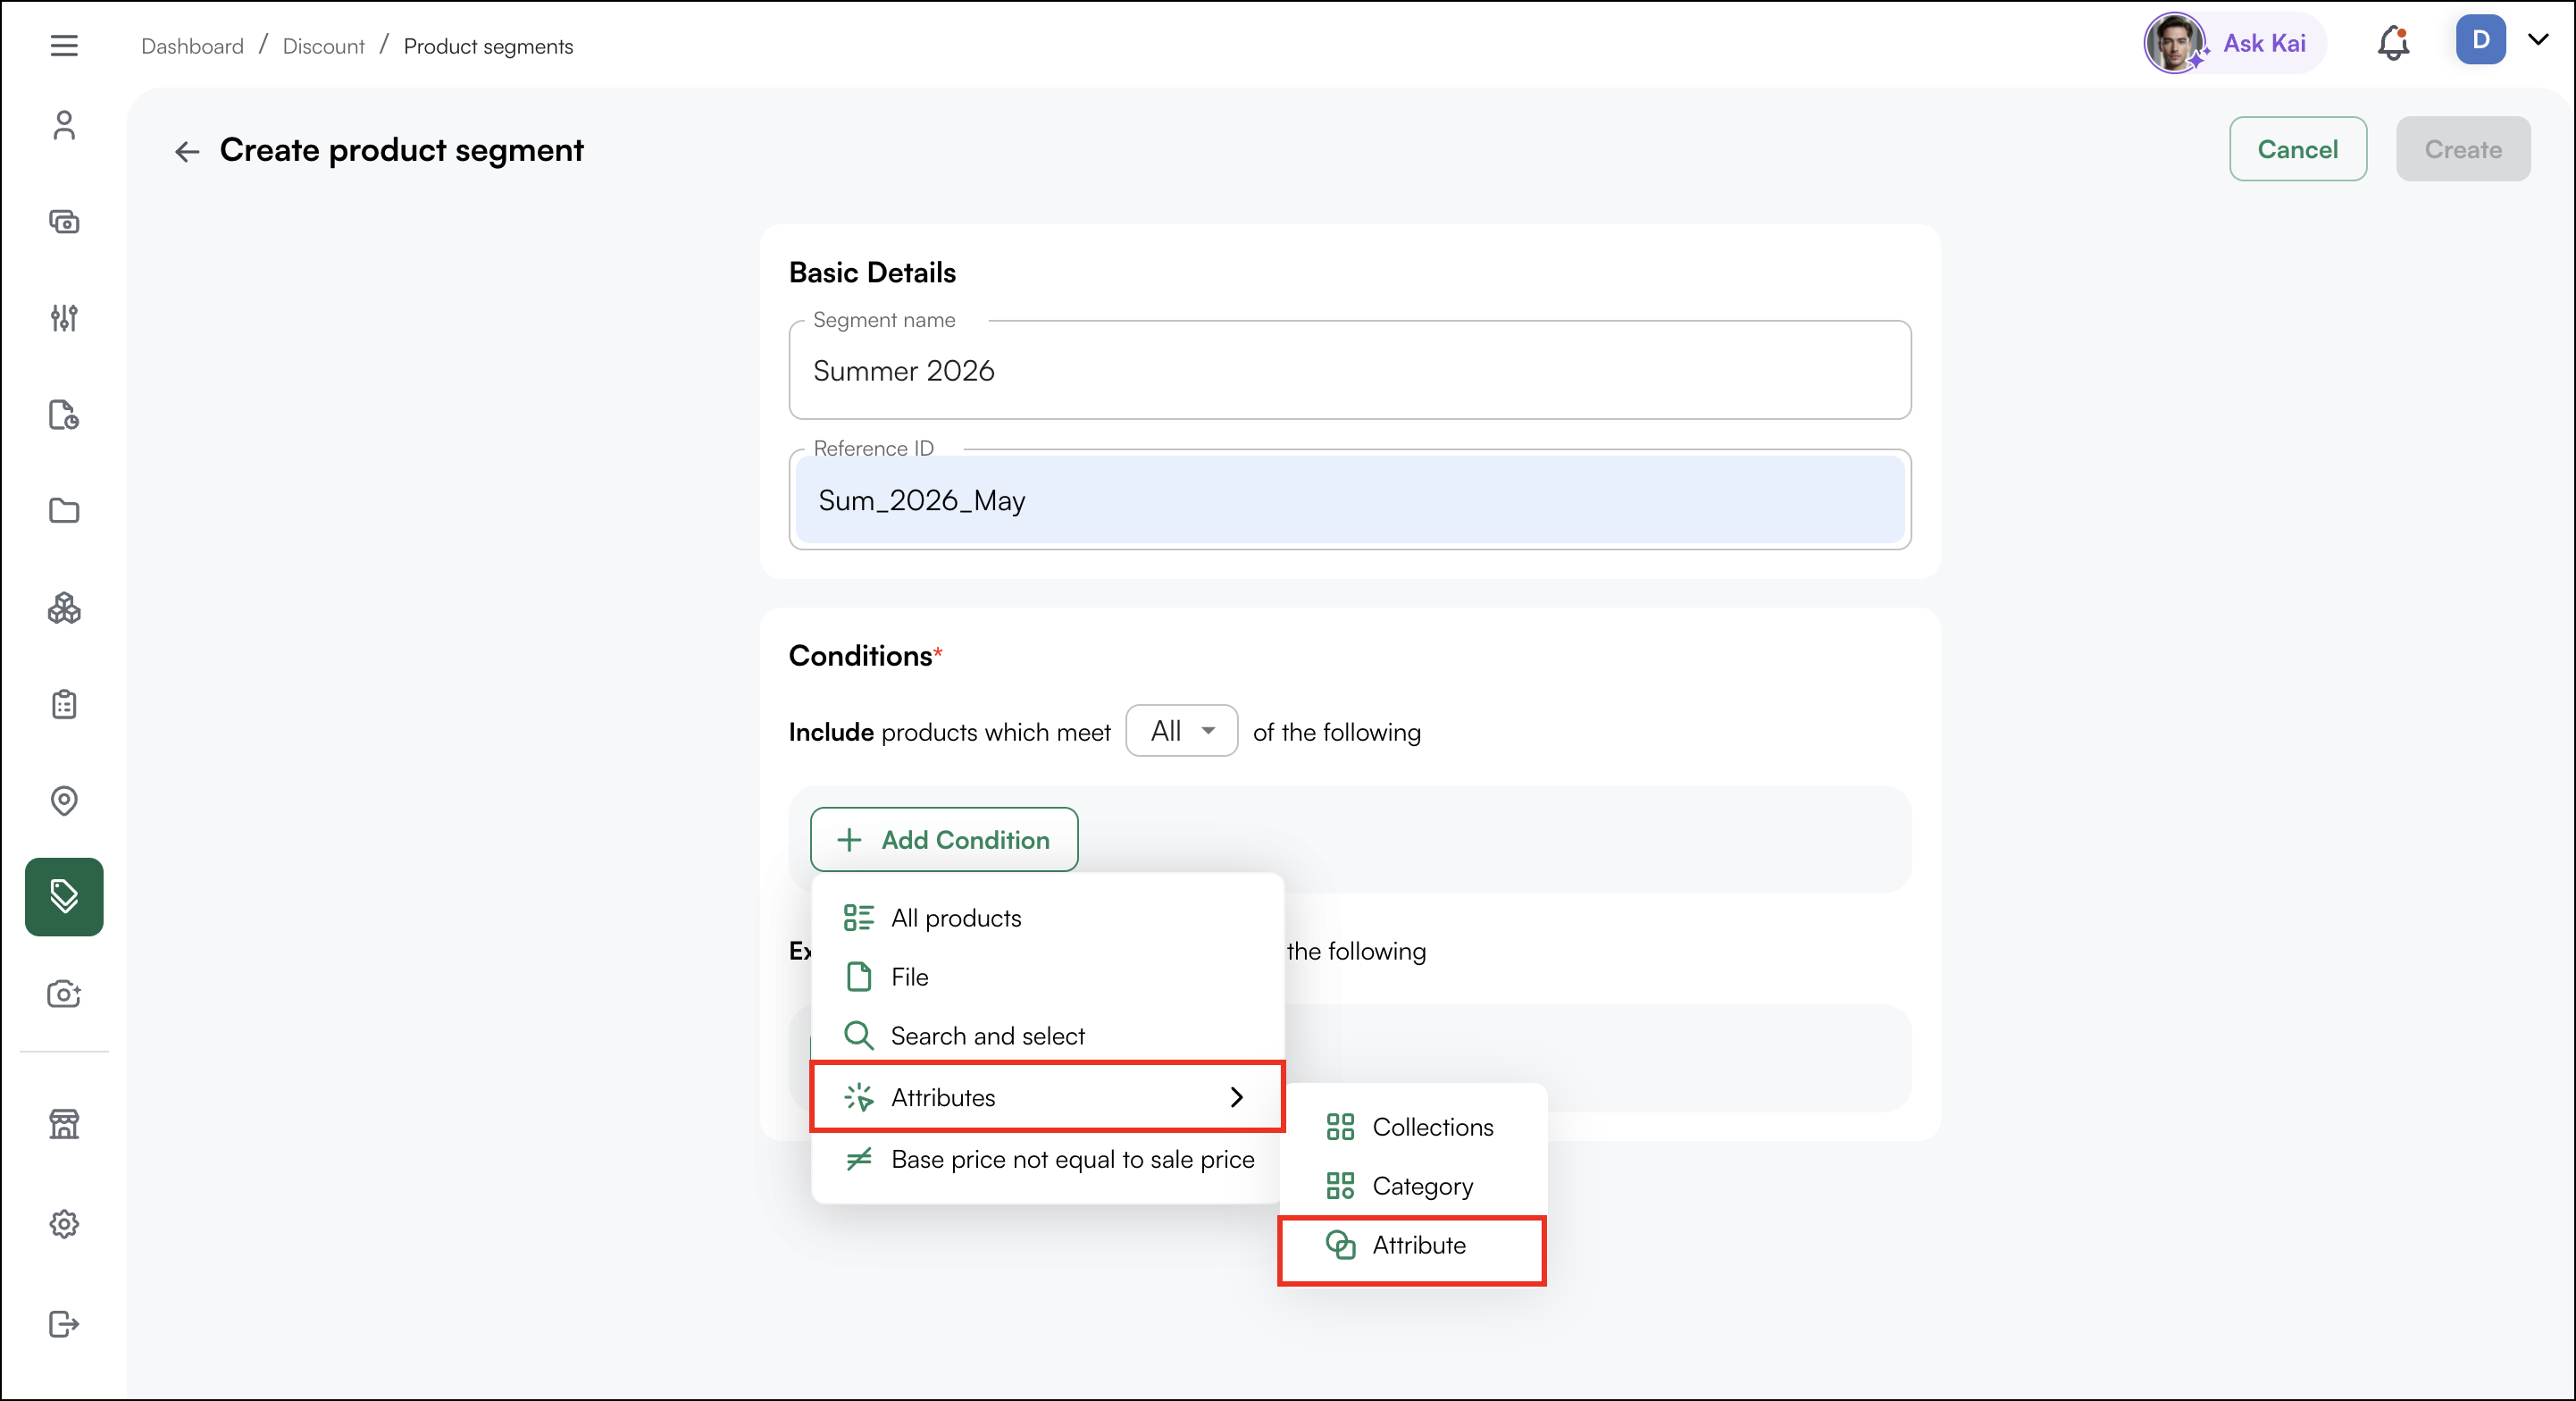
- Under Include products which meet (All / Any) of the following (or under Exclude), click + Add Condition, then select Attributes.
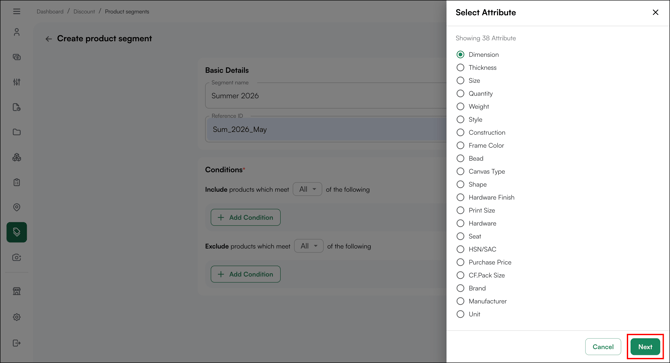
- In the attribute side sheet, select the attribute you want to filter on. The side sheet lists both default attributes and any custom attributes configured in your catalog. Select one attribute, then click Next.
- Choose an Operator and set a Value. The operators available depend on the attribute you selected (see below).
- Click Add to apply the condition.
Operators
The operators you see depend on the attribute's data type. Each one controls how products are matched against the value you enter.
» Equals / Not equals
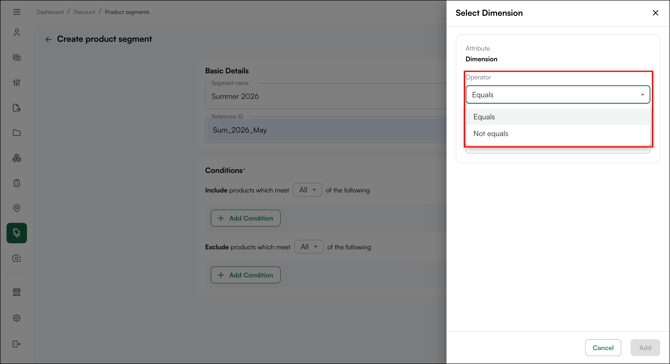
For text and number attributes, use Equals or Not Equals to match products by a single value you enter.
- Equals: Includes products whose value matches exactly what you enter. For example, Size Equals small includes only small-size products.
- Not equals: Includes products whose value is anything other than what you enter. For example, Size Not equals small includes every product that is not small.
The value is a typed field, enter the value directly.
» Has / Has Not
For single-select attributes, use Has or Has not to match products by whether they carry the value you select.
- Has: Includes products that carry the selected value.
- Has Not: Includes products that do not carry the selected value.
» All / Any of / None
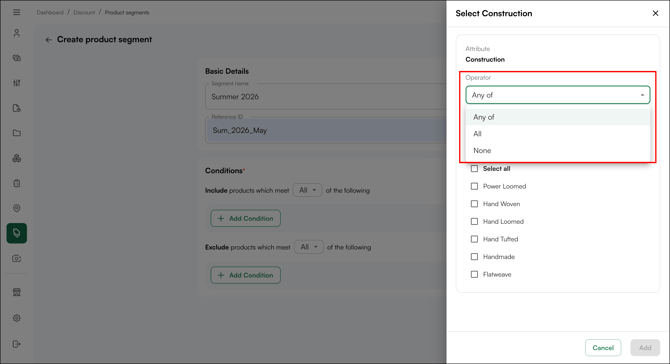
For multi-select attributes, use Any, All, or None to match products across the values you select.
- All: Includes products that carry every value you select.
- Any of: Includes products that carry at least one of the values you select.
- None: Includes products that carry none of the values you select.
Value field types
The value field changes based on the attribute's data type:
- Single-select: Choose one value from a list.
- Multi-select: Choose one or more values from a list.
- Numeric: Enter a number, including decimals.
- Text: Type the value to match.
- Alphanumeric: Enter a value containing both letters and numbers.
Tip: Adding multiple conditions does not apply when All Products is selected. Selecting All Products includes your entire catalog and ignores any other conditions added to the segment.
Note:
-
Create your customer and product segments before building discount rules. This way your segments are ready to select when you configure eligibility during discount setup.
- Exclude takes priority over Include. If a product matches both an include and an exclude condition, it is excluded from the segment.
- Attribute conditions do not apply when All Products is selected. Selecting All Products includes your entire catalog and ignores all other conditions.
-
Product segments can be edited after creation. You can add or remove products from an existing segment as needed.
D. How to Stop a Discount
This applies to both Product and Cart discounts.
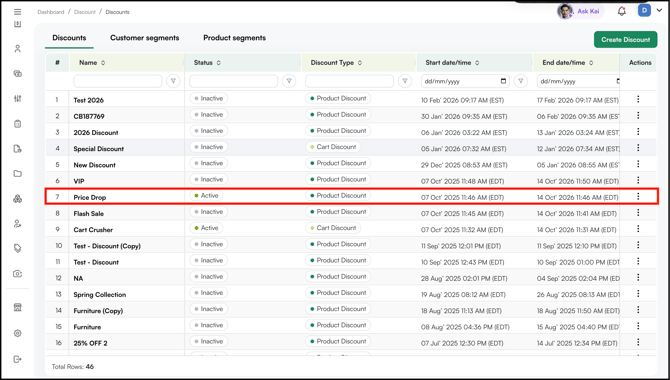
- Click on the discount name in the Name column to open it.
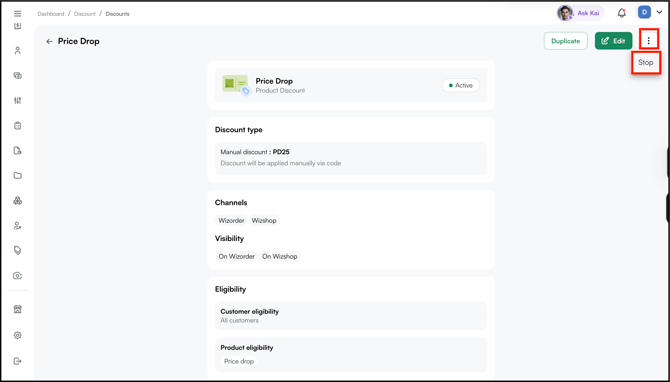
- Click the three-dot menu at the top left of the discount page.
- Select Stop.
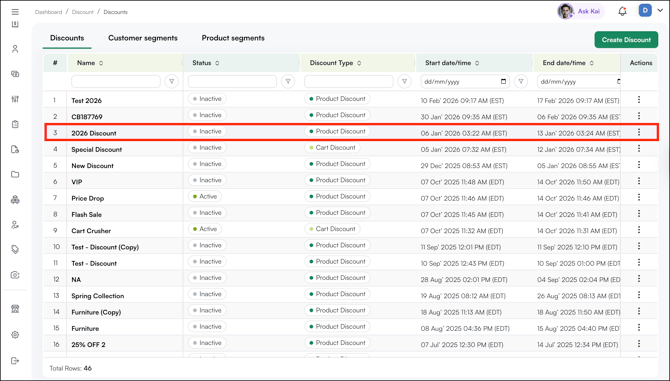
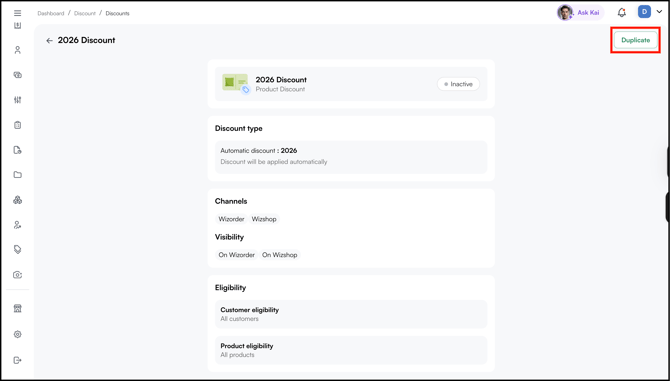
Note: Click Duplicate on a inactive discount to create a copy, adjust it as required, and select Publish to bring it back into effect.
FAQs
1. Do I need to create segments before setting up a discount?
A. Yes, if you plan to restrict a discount to specific customers or products. Create your customer and product segments first so they are ready to select when you configure eligibility during discount setup. If you want to apply the discount universally, select All Customers and All Products instead.
2. What is the difference between a Fixed Discount and a Tier Discount for cart discounts?
A. A Fixed Discount applies a single rate once the cart threshold is met, for example, 10% off all orders over $500. A Tier Discount applies different rates based on cart value ranges, for example, 10% off at $500 and 30% off at $1,000. Use tiers to reward buyers the more they spend.
3. Can I reuse a stopped discount?
A. Yes. Open the stopped discount, click the three-dot menu, and select Duplicate. Make any changes needed and click Publish to make it live again.
4. How do I update a live discount?
A. Open the discount from the Discount Engine, click on Edit. From there, you can swap the customer or product segment, adjust the discount value, or update the date range. Click Save to apply the changes. The discount stays active throughout, only what you've changed updates.
Still need help? Reach out to our support team at help@wizcommerce.com.