
For packaged products, bottles, jars, and tabletop items, the most common issues are logos and labels that get changed and small products that look the wrong size in the scene. The image may look beautiful but no longer match the product you sell.
This article explains how to prepare your product images, keep logos and labels accurate, and check your results before you download.
Platform: WizStudio | Who is this for: Designers & Marketing Teams
Table of Contents
|
Sections |
Topics |
|---|---|
|
A |
|
|
B |
|
|
C |
|
|
D |
|
|
E |
|
|
F |
|
|
G |
|
|
H |
|
|
I |
|
|
J |
Before You Begin
- You must have access to WizStudio.
- Have your highest-resolution product image and a clear image of the label ready.
- Keep verified product dimensions on hand.
Core principle: Your product image is the source of truth. Use your prompt to describe the scene, camera, lighting, and action around the product. Never let the AI redesign the product or its label to get a look.
Note: Clear images and specific prompts reduce AI mistakes but do not remove them completely. Always compare the result with your original product image before you download.
A. Prepare Your Images
Your product image and product details have the biggest impact on the result.
1. Upload the clearest image you have
- Use the highest-resolution original you have, with the product large and sharp. If you can't see a detail in your image, the AI probably can't either.
- Make the product fill the canvas. A product that fills the canvas keeps its details better than a small product in a large space.
- By default, WizStudio removes the background when you upload a product to the canvas. If your product is a light shade (for example, white, off-white, or beige packaging) that may blend into a white background, turn on the background toggle on the canvas. This removes any background applied.
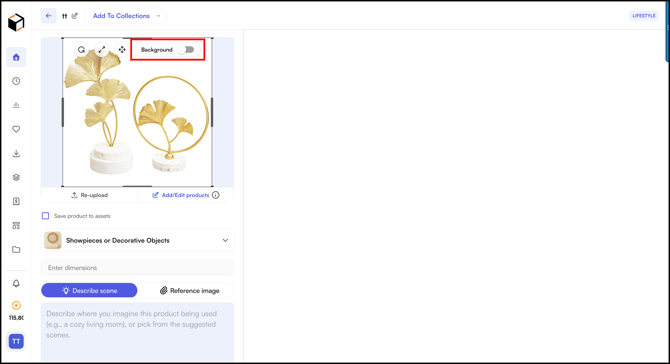
- Avoid blurry screenshots and heavily compressed images. Labels and logos get changed when they aren't clearly visible.
- For fine details, add close-ups on the canvas as extra images. Copy and paste the same image, then crop it and make it larger.
2. Upload each side that looks different
If the front, back, and sides aren't the same, upload an image of each. Otherwise, the AI assumes all sides look the same.
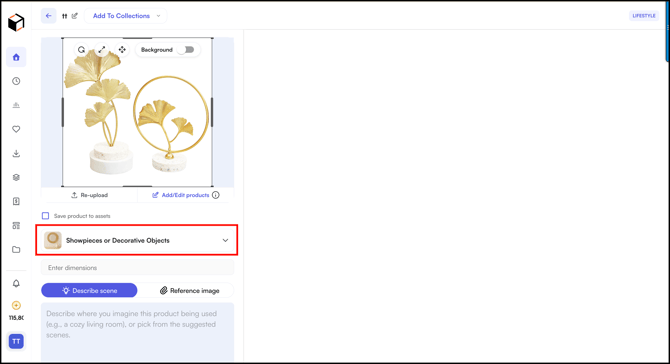
3. Check the product category
WizStudio detects the category when you upload. If it's wrong, change it from the Category dropdown before generating. You can also create your own category. Suggested scenes and category-specific results depend on it.
4. Enter accurate dimensions
- Always enter verified measurements as Length × Width × Height (for example, 10" L × 8" W × 4" H). For round products such as bottles or jars, use D for diameter. You can switch between inches and centimeters.
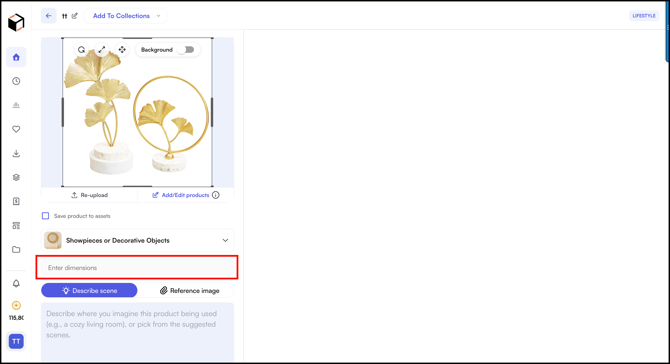
- Repeat the key dimensions in your prompt.
- Don't leave the size for the AI to guess. Small products can look much too big or too small without dimensions.
- Resize small products on the canvas to the size you want them to appear in the final image. This also helps the AI get the size right.
5. Place more than one product
- Treat the canvas as your vision board. Place each product where you want it in the final image. This helps the prompt work as you expect.
- Size each product so it looks right next to the others. It doesn't need to be exact, only in proportion.
- Enter dimensions for every product. One missing dimension can throw off the size of the whole scene.
Note: Dimensions guide the size but do not guarantee it. Check each result against something in the scene with a known size, such as a table height.
B. Keep Logos and Labels Accurate
Changed or distorted logos and labels are the most common issue for these products.
- Upload a clean, straight-on image of the label so every word and detail is clear.
- Tell the AI not to change the design, and write the exact logo text in quotes. For example:
"Do not redesign or alter the existing design of the product in the input image. Logo text: "[your logo text]"."
C. Write Your Prompt
For simple products, a short prompt plus Enhance Scene works well. For products with labels, fine details, or a specific material, write your prompt as a clear list of instructions, not a creative description.
Describe things in this order, from most to least important:
what the product is → its shape → material, texture, and finish → color → size → setting → camera → lighting → props
Keep two kinds of instructions apart:
- Things that must not change: shape, proportions, materials, finish, labels, logos, and text.
- Things you can change freely: setting, camera, lighting, and props.
Keep props separate from the product. Describe the product and the props in separate parts of your prompt, so the AI doesn't treat a prop as part of the product. Use as few props as you can. Every extra object is another chance for size mistakes, hidden details, or changes to the product.
Use images with clear roles. WizStudio allows one reference image slot per generation. To show more angles or details, place them on the canvas and label each one in your prompt:
- Image 1, product: the exact product, shape, and proportions
- Image 2, detail: only the detail you name (for example, the label)
- Image 3, setting: setting, styling, and lighting only
Tell the AI not to mix product shapes between images, and say which image wins if they don't match. For more, see How to Use Reference Images in WizStudio.
D. Describe the Material
A color alone isn't enough, because the AI may swap one material for a similar-looking one. Describe four things:
Material → Texture → Finish → How it reflects light
|
Describe |
Use words like |
Avoid |
|---|---|---|
|
Material |
fluted amber glass, brushed brass |
glass, gold |
|
Texture |
vertical ribbing, directional brushing |
realistic texture, detailed |
|
Finish |
matte, satin, semi-gloss, high-gloss, polished |
premium finish |
|
How it reflects light |
controlled reflections, low reflectivity, translucent glow |
beautiful lighting |
E. Fix Common Errors
If the same mistake keeps appearing, name that exact mistake in your prompt. This works better than asking the AI to "be accurate."
|
If this happens |
Add this to your prompt |
|---|---|
|
Material changes |
"Material is locked; do not substitute a similar-looking material." |
|
Finish changes |
"Finish is locked to [matte / satin / polished / high-gloss]." |
|
Product is hidden by props or people |
"Product stays unobstructed; props and people never cover key features." |
For logo or label changes, see Section B.
F. Camera Angles and Videos
Use these prompts to get clear close-ups of labels and materials. For videos, tell the AI exactly what moves and what stays still, so the product and its label don’t change from frame to frame.
|
Shot you want |
Prompt language |
|---|---|
|
Label or material close-up |
"Tight close-up of the named surface; shallow depth of field; preserve exact texture." |
|
Moving shot (video) |
"Slow dolly or orbit with fixed product shape and constant scale." |
For videos, tell the AI what moves and what stays still:
"PRODUCT CONTINUITY LOCK: Product stays identical from first to last frame, with exact geometry, dimensions, materials, textures, finish, hardware, and surface patterns. CAMERA: slow, controlled 60° clockwise orbit at constant height and distance. PRODUCT: stationary. LIGHTING: stable. BACKGROUND: stable except natural depth-of-field movement. ONLY CHANGE: [action]. No morphing, sudden zoom, new parts, disappearing parts, or material change."
Video tips →
- Add your lifestyle image as the first media reference so the video starts from an existing scene. Add the product silo as a reference too.
- Use the Script Assistant to plan and change shots instead of editing the script text directly. It splits the video into short shots, which reduces mistakes. Long single shots tend to drift away from the product.
- Describe camera moves to the Script Assistant shot by shot.
- Add people or action last. People can block parts of the product or change its shape.
See Create AI Product Videos for the full video steps.
G. Prompt Template
Copy this template and fill in the brackets. Remove any line you don't need.
ROLE: Act as an experienced commercial product photographer/cinematographer specializing in [TO CONFIRM: wording for gift, tabletop, and food & beverage].
REFERENCE: Use the supplied image(s) as the source of truth.
OBJECTIVE: Create [IMAGE / VIDEO] of the exact product in [SCENE].
PRODUCT FIDELITY (ABSOLUTE PRIORITY): Preserve exact silhouette, proportions, construction, component count, materials, texture, finish, color, hardware, labels, and fine details.
MATERIAL LOCK: Material = [specific material]. Texture = [grain / weave / ribbing / pile]. Finish = [matte / satin / polished / high-gloss]. Light response = [diffuse / specular / translucent]. Do not substitute or reinterpret the material.
SCENE: [setting / background]
STYLING: [only requested props]
COMPOSITION: [placement / scale / visibility]
CAMERA: [shot / angle / height / lens / movement]
LIGHTING: [direction / softness / contrast]
ACTION (VIDEO ONLY): [exact movement]
NEGATIVE CONSTRAINTS: No extra components, no redesign, no material substitution, no invented hardware, no altered proportions, no incorrect labels, no unwanted props.
OUTPUT: Photorealistic, physically plausible, commercially polished, accurate scale, believable contact shadows.
H. Tools That Help
These WizStudio features help you clean up, edit, and create images of your gift, tabletop, and food & beverage products faster. Pick the one that fits what you need to do.
|
Tool |
How to use it for gift, tabletop, and food & beverage |
|---|---|
|
Lifestyle Generator |
Check the category, add dimensions, start with a suggested scene or Enhance Scene, review all the results, and save strong ones as Themes. |
|
AI Edit / Prompt-Based Editing |
To fix one thing (for example, remove a prop), edit the image instead of re-prompting the whole scene. Re-prompting can change things you wanted to keep. See Prompt-Based Image Editing. |
|
Silo Editor |
Free to use for cleanup and removing reflections. For Magic Eraser, trace closely with a small brush. You can continue a silo straight into the Lifestyle Generator. If a silo was made from a low-resolution image, compare it with the original; a cleaner silo isn't always more accurate. |
|
Bulk Silo Editor |
Clean up to 50 images at once (for example, a range of bottles) and apply the same backdrop to all of them from a reference image. [TO CONFIRM: Download in batches of about 30 to 40; larger batches can fail.] |
|
Reference Images & Themes |
Use Use Exact Background when all products need the same setting, and Use as Style Inspiration for a similar feel with more variety. Save strong images as Themes and reuse them across SKUs. |
|
Multi-Product Staging |
Size each product in proportion on the canvas, enter dimensions for every item, and fill the canvas. See Generate Lifestyle Images with Multiple Products. |
|
Bulk Lifestyle |
Set the scene, camera angle, and look on one product, then apply it to up to 50 products. Works best on similar products. See Bulk Lifestyle. |
I. Workflow and Final Check
Recommended workflow →
- Start with the clearest image, plus a straight-on image of the label.
- Describe the product and what must not change, including the exact logo text.
- Describe the material: material, texture, finish, and how it reflects light.
- Test with a simple scene first. Make sure the product and label stay accurate before adding props.
- If the same mistake repeats, name it in your prompt.
- Add camera and lighting instructions.
- Add people or action last.
- For videos, say exactly what moves and what stays still.
- Check the result against the list below before you download.
Before you download, check that:
- The shape and proportions match the original
- Logo and label text match your product exactly
- Each side of the product shows the correct design
- Material and finish are correct
- Color and undertones are accurate
- The product looks the right size in the scene
- Reflections don't show objects that aren't there
- Shadows look natural
- In videos, the product stays the same in every frame and only the requested things move
- Props support the product and don't hide it
Pay extra attention to logos, labels, and shiny surfaces. Download in 4K or 8K for print, and check again after every edit.
Still getting the wrong result? If a product keeps coming out wrong after several tries, share the SKU or generation link with your Customer Success Manager. The WizStudio stylist team can review your prompt and product details, and for bulk or complex jobs, the Done-For-You team can create images for you to review in the platform.
FAQs
1. Why did the logo or text on my label change?
A. This can happen when the label isn't clear in your image, or when the AI tries to redesign it. Upload a clean, straight-on image of the label and use the prompt in Section B. WizStudio also gives you more than one result, so you can pick the most accurate one.
2. Why does my small product look too big or too small? Do I have to enter dimensions?
A. Dimensions aren't required, but they're strongly recommended. Without them, the AI guesses the size. Enter the product's dimensions and resize the product on the canvas, as shown in Section A, step 4.
3. My lifestyle images all look similar. How do I get more variety?
A. Describe the setting in more detail, including style, era, and mood. You can also use Use as Style Inspiration with a different reference image for each product to get a similar feel with more variety.
4. Should I re-prompt or edit when only one thing is wrong?
A. Edit. Use AI Edit or Resize & Move with Re-blend to change one thing. AI Edit keeps the rest of the image the same, while re-prompting the whole scene can change things you wanted to keep.
Still need help? Reach out to our support team at help@wizcommerce.com.